I spent three months testing hand lettering kits to find the best hand lettering kits for beginners that actually teach you something. Most kits promise the world but leave you staring at a blank page wondering why your letters look shaky. The right kit should include quality tools, clear instructions, and enough practice materials to build real muscle memory.
Our team tested seven popular starter sets across different styles. We looked at brush pens, traditional dip pens, fountain pen sets, and marker-based kits. Each kit was evaluated for ease of use, instruction quality, tool durability, and how quickly a complete beginner could produce recognizable letterforms.
Hand lettering is different from calligraphy in one key way. Calligraphy follows strict rules and historical scripts, while hand lettering is more about drawing decorative letters with personality. Many beginner kits blend both approaches, which is why we included a range of tool types in this 2026 guide.
Before you buy any kit, think about where you will practice. I tested all of these kits at a kitchen table, a coffee shop, and a dedicated desk. The marker-based kits traveled best.
The dip pen sets required more setup and cleanup time. That practical difference matters more than most product descriptions admit.
Table of Contents
Top 3 Picks for Best Hand Lettering Kits for Beginners (July 2026)
After dozens of practice sessions and hours of comparison, three kits stood out from the rest. Each serves a different beginner need, from workbook-driven learning to maximum value.

June & Lucy Calligraphy Kit for Beginners
- Hardcover workbook with practice pages
- 6 marker pens in 4 tip sizes
- Water-based non-toxic acid-free ink
- Flexible tip for varying stroke widths
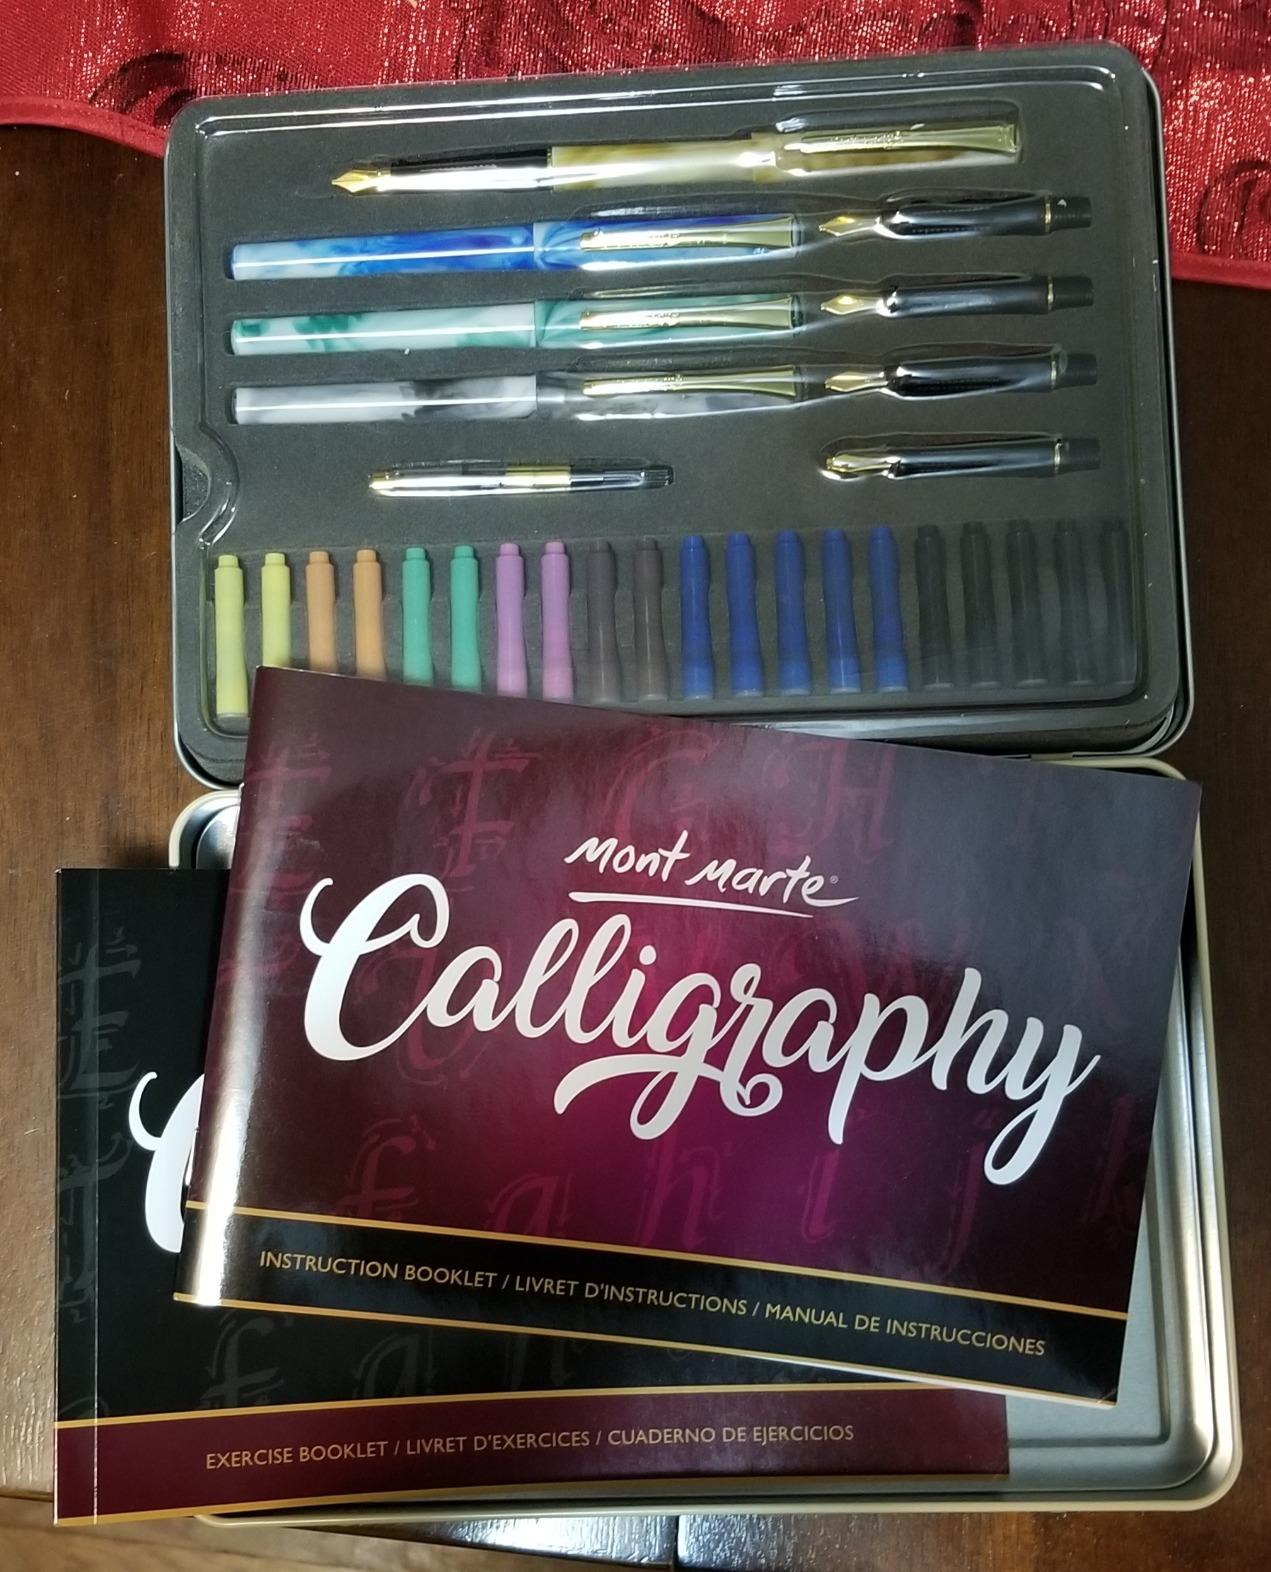
Mont Marte Calligraphy Set 32 Piece
- 4 refillable pens and 5 nibs
- 20 ink cartridges included
- Exercise and introduction booklets
- Tin box for organized storage

Speedball Elegant Writer Calligraphy 6...
- 6 assorted marker colors
- 3.0mm chisel nib tip
- Acid-free and non-toxic ink
- Improved ink flow design
Best Hand Lettering Kits for Beginners in 2026
Below is a quick comparison of all seven kits we tested. This table covers the core details you need to narrow down your choice before reading the full reviews.
| Product | Specifications | Action |
|---|---|---|
| June & Lucy Calligraphy Kit for Beginners |
|
Check Latest Price |
| Mont Marte Calligraphy Set 32 Piece |
|
Check Latest Price |
 Kuretake ZIG Calligraphy Marker Pens 12 Colors Kuretake ZIG Calligraphy Marker Pens 12 Colors |
|
Check Latest Price |
| Speedball Elegant Writer Calligraphy 6 Marker Set |
|
Check Latest Price |
 Artworx Calligraphy Pens Set Artworx Calligraphy Pens Set |
|
Check Latest Price |
 Tombow 56301 Creative Notetaking Kit Tombow 56301 Creative Notetaking Kit |
|
Check Latest Price |
 Speedball Basic Calligraphy Set 7 Piece Speedball Basic Calligraphy Set 7 Piece |
|
Check Latest Price |
1. June & Lucy Calligraphy Kit for Beginners – Workbook-Driven Learning
Calligraphy Kit for Beginners - Calligraphy Pen Set with Calligraphy Workbook
- Beautiful hardcover workbook with practice pages
- 6 pens in 4 tip sizes
- Non-toxic acid-free black ink
- Flexible tip for varying stroke widths
- Perfect for beginners and advanced users
- Only black ink available
- Practice pages benefit from tracing paper overlay
I opened this kit on a Sunday morning and completed the first three workbook exercises before lunch. The hardcover book feels substantial in your hands, and the gold spiral binding lets it lay flat while you practice. Each page builds on the last one, which is exactly what beginners need when they do not know where to start.
The six marker pens come in four sizes: extra-fine, fine, medium, and brush. I found the brush tip most forgiving for learning thick and thin strokes. The water-based ink is non-toxic and acid-free, so I did not worry about it bleeding through decent practice paper.
I tested the pens on Rhodia dot paper and Canon Marker Paper, and both performed well without feathering. Our team gave this kit to three complete beginners with no drawing background. All three produced readable letterforms within the first week.
The flexible tip responds to pressure changes naturally, which means you spend less time fighting the tool and more time learning letter shapes. The gold spiral binding is a small detail that makes a big difference. I have used workbooks with glued bindings that fight you while you write.
This one stays open on its own, which is important when you are focusing on stroke direction and pen angle. The extra-fine and fine tips are useful for adding details. I used the fine tip to write small captions under larger brush-lettered words.
The workbook includes both instruction and practice pages. I recommend placing a sheet of tracing paper over the practice pages if you want to reuse them multiple times. The paper in the book itself is smooth and thick enough for the included pens, though heavy saturation can show through on the reverse side.
One thing that surprised me was how portable the kit is. The entire set fits in a small tote bag, making it easy to practice at coffee shops or during lunch breaks. I took it to three different locations over two weeks and the pens never dried out or skipped.
This kit focuses exclusively on black ink. That limitation actually helps beginners because you are not distracted by color choices. You learn stroke mechanics first, then add color later when you graduate to other tools.
The instruction pages explain the difference between upstrokes and downstrokes. I had never noticed that my natural handwriting puts the same pressure on every stroke. The workbook breaks that habit quickly by making you pay attention to pressure.
How the Workbook Supports Self-Paced Learning
The workbook structure matters more than most beginners realize. June & Lucy organized the lessons so you start with basic strokes before combining them into full letters. Each section has traceable examples followed by blank lines for independent practice.
I found this progression kept frustration low because you are never asked to draw something you have not practiced first. The instructions are written in plain language without unnecessary jargon. I appreciated that the book explains why certain strokes use thin upstrokes and thick downstrokes, rather than just telling you to copy a picture.
Understanding the reasoning behind the shapes makes a real difference when you start creating your own lettering styles. I kept the workbook on my desk and practiced for ten minutes each morning. The short sessions added up quickly because the book told me exactly what to do each day.
I did not waste time deciding what to practice, which removed a common barrier for beginners.
What to Know About Paper Compatibility
The included workbook paper works well for the kit pens, but you will want to buy separate practice paper once you finish the book. The forums we checked consistently recommend Rhodia dot pads and Canon Marker Paper for hand lettering practice. Both papers have smooth surfaces that help the pens glide without catching fibers.
Avoid cheap printer paper. It creates friction that drags on the brush tip and causes ink to feather at the edges. I tested the June & Lucy pens on five different paper types, and the difference between smooth and rough paper was immediately visible in the stroke quality.
If you want to practice on the go, carry a small pad of Rhodia paper with the kit. The pages are thin but smooth, and the dot grid helps you keep letters straight without heavy pencil guidelines. I used a Rhodia pad for three weeks of commuting practice and never noticed bleed-through.
2. Mont Marte Calligraphy Set 32 Piece – Complete All-in-One Kit
- Complete 32-piece all-in-one kit
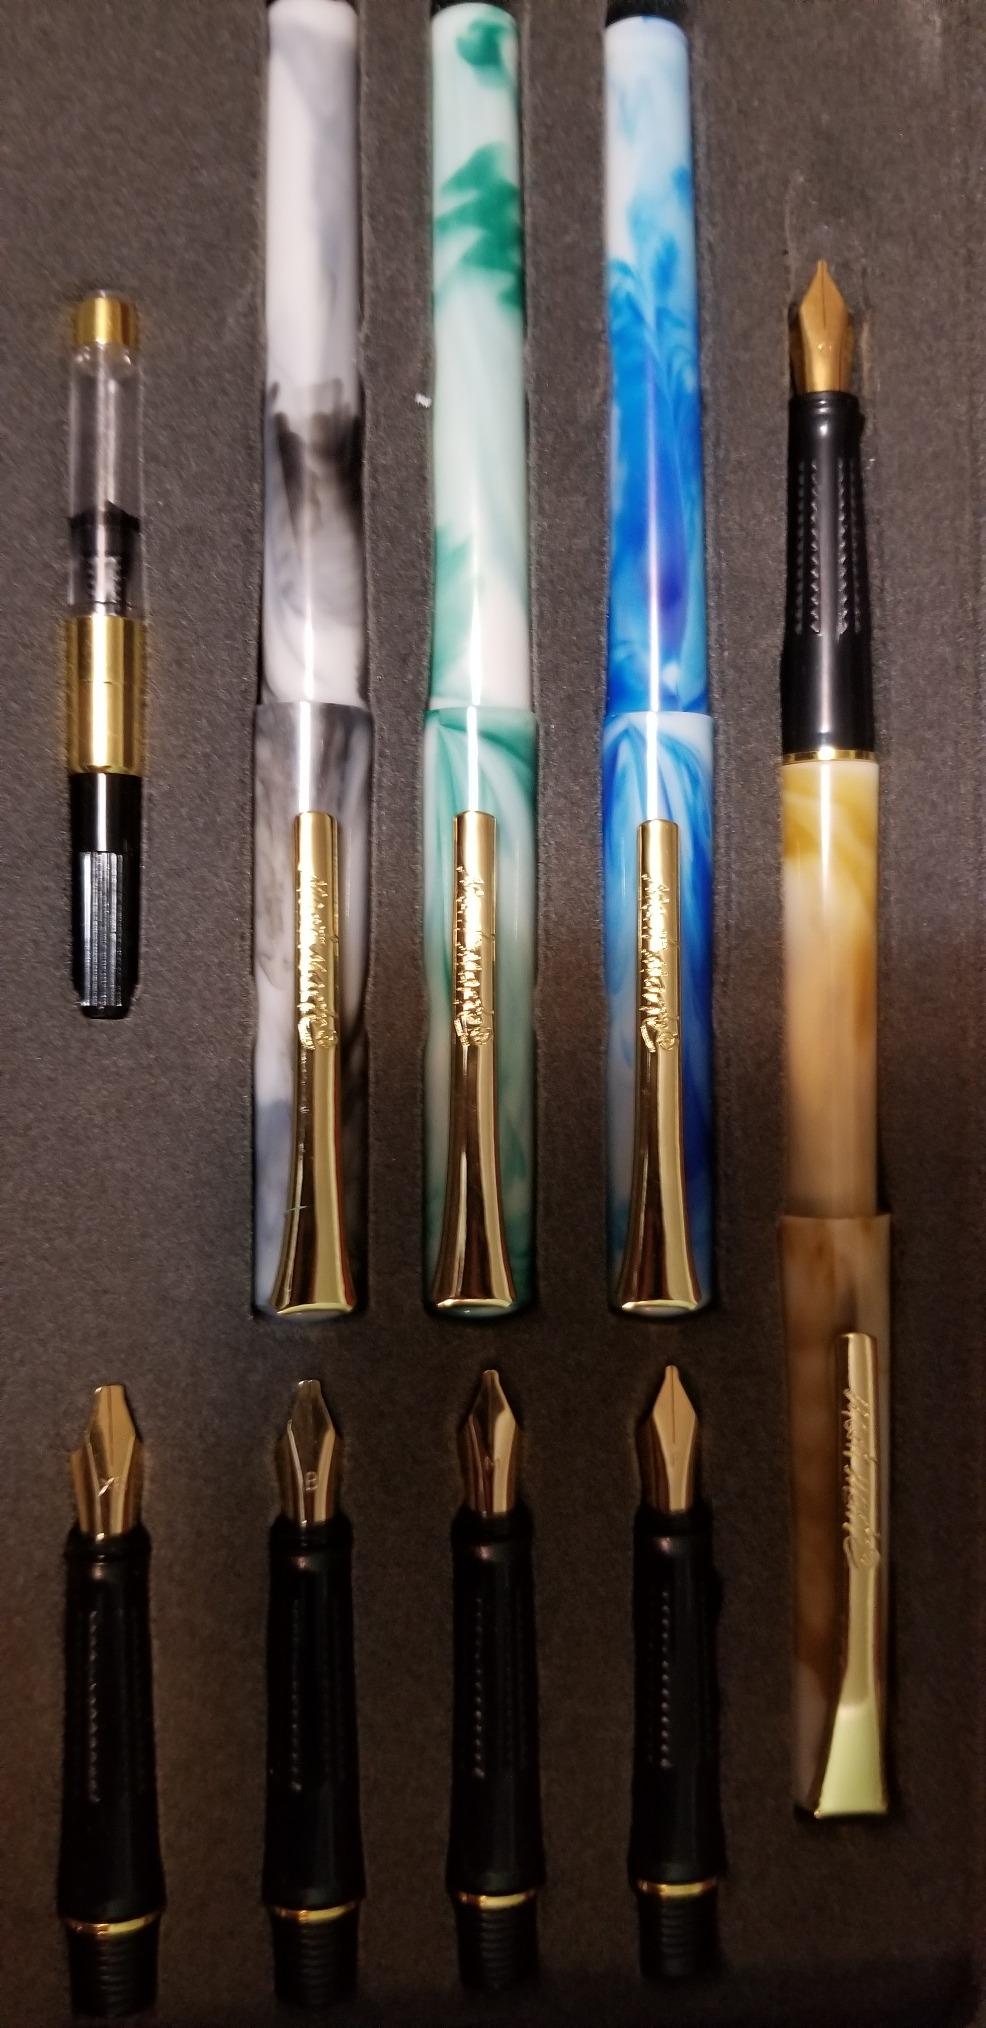
- 4 refillable pens with 5 nibs
- 20 ink cartridges included
- Tin box for organized storage
- Great for Roman Italic Gothic styles
- Instructions can be confusing
- Practice booklet paper is thin and bleeds
- Some nibs need breaking in
This tin box contains everything a beginner needs to try traditional dip-style calligraphy without buying supplies separately. I opened it to find four refillable pens, five different nibs, twenty ink cartridges, an ink pump, and two booklets. That is a lot of value packed into one set.
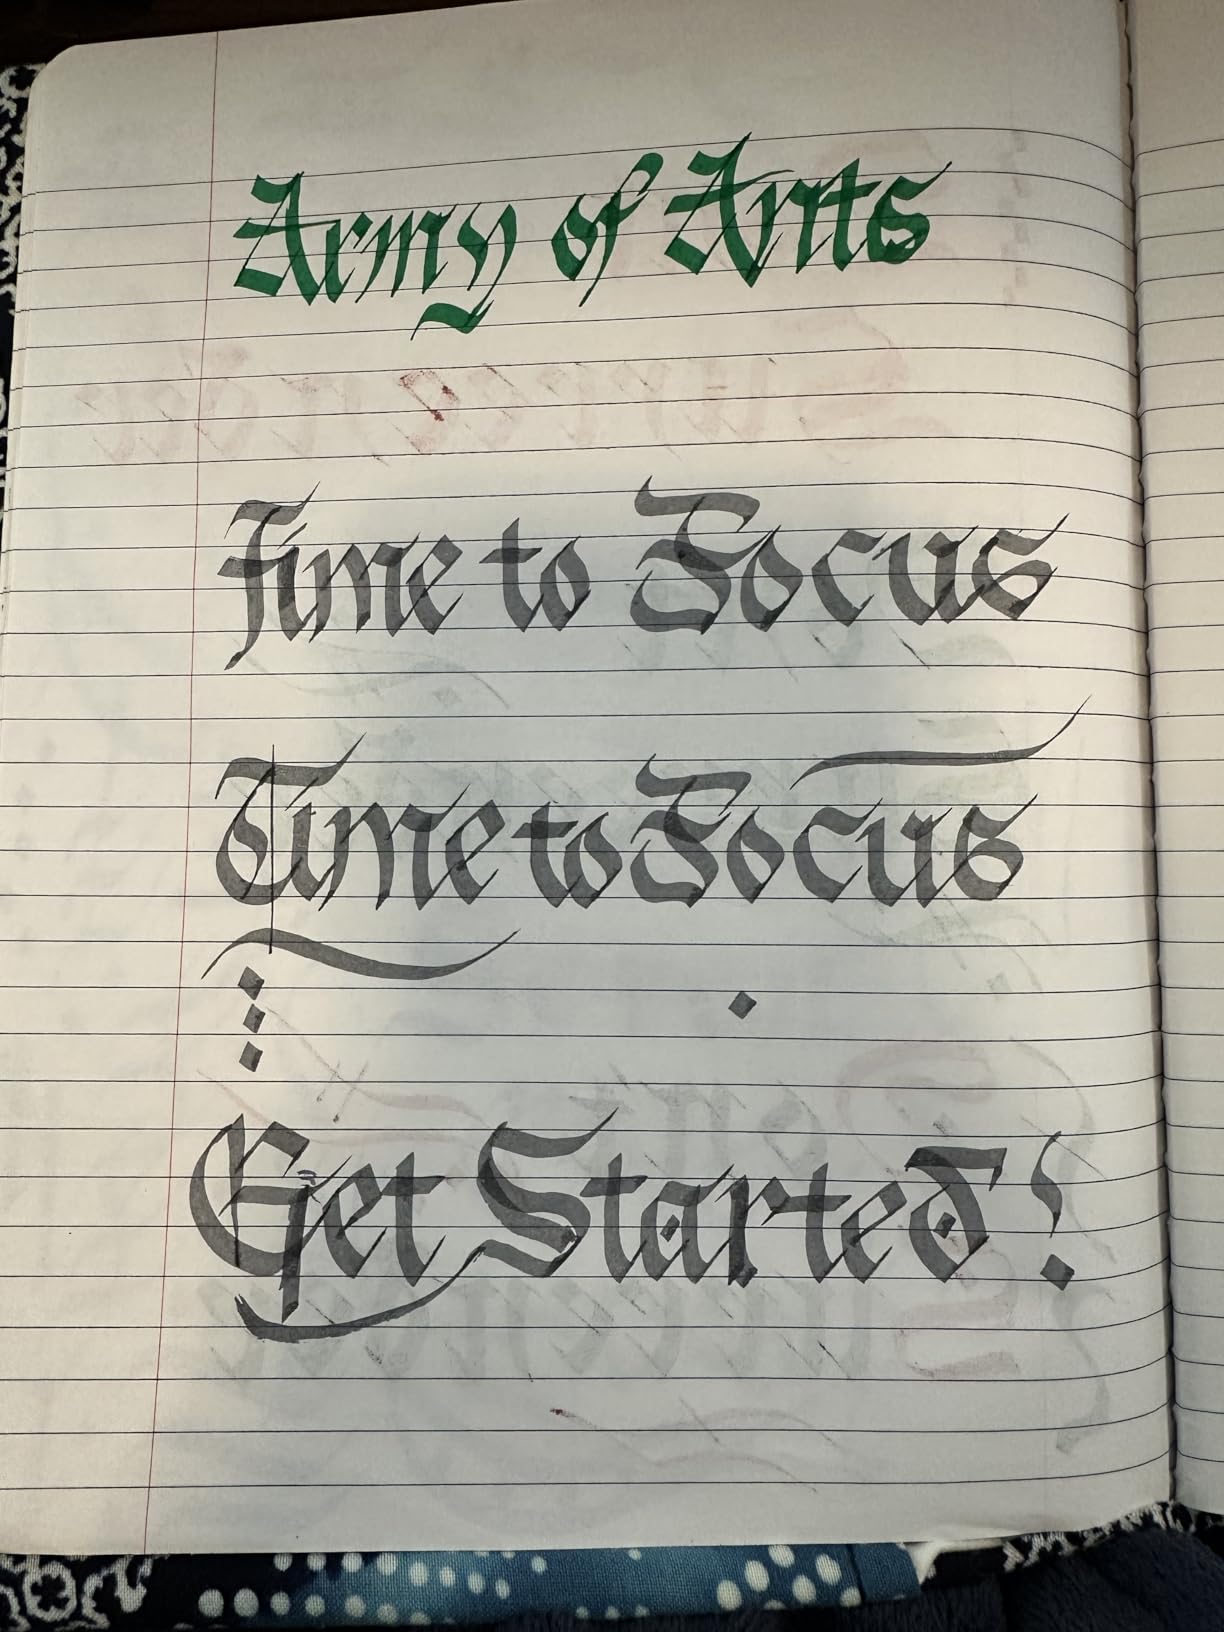
The traditional nibs work well for Roman, Round Hand, Italic, and Gothic styles. I spent the first three days just swapping nibs to see how each one changed the line width. The C-style nibs are the most beginner-friendly because they hold more ink and produce consistent flow.
The tin packaging makes this kit feel like a gift. I gave it to a friend who had never tried calligraphy, and she had the first nib inserted within ten minutes. The ribbed grip on the pens helps with control, especially when you are still learning how much pressure to apply.
The fountain pens feel lighter than I expected. Each pen has a click-off cap that seals tightly, so I never had ink dry in the nib during storage. I left one pen capped for two weeks and it wrote immediately when I uncapped it.
The ink pump is a nice bonus. It lets you draw bottled ink into the pen when you run out of cartridges. Most beginner kits force you to buy cartridges forever, so this feature adds long-term value.
I tested it with a standard black India ink and the pump worked smoothly. That flexibility is rare in beginner kits at this price range.
The exercise booklet is useful, but the paper is thin. I noticed ink bleeding through to the back of several pages when I used the broader nibs. Switching to separate practice paper solved the problem immediately, but it is worth knowing before you start.
The instructions could be clearer. I had to look up a video online to figure out how to insert the ink cartridges properly. Once I understood the mechanics, the pens wrote smoothly.
But the included booklet assumes some prior knowledge that true beginners may not have. That gap is the biggest weakness of the set.
With over five thousand reviews, this kit has a strong community of users. The consensus is that it offers excellent value for the number of items included. I agree that the variety of nibs alone makes it worth considering if you want to experiment with different calligraphy styles.
The tin box is also practical for storage. I kept all the small parts organized and never lost a nib. The lid snaps shut firmly, which matters when you are carrying the kit in a bag with other supplies.
Which Calligraphy Styles Work Best With This Set
The five nibs included cover a surprising range of lettering styles. The smaller nibs are perfect for Roman text and Italic alphabets, while the larger ones handle Gothic and Uncial scripts with ease. I found the variety encouraging because I could try multiple styles before committing to one.
The set also includes an ink pump for bottled ink. This is a nice feature that most beginner kits skip. Once you move past the included cartridges, you can experiment with Sumi ink or colored gouache without buying a new pen.
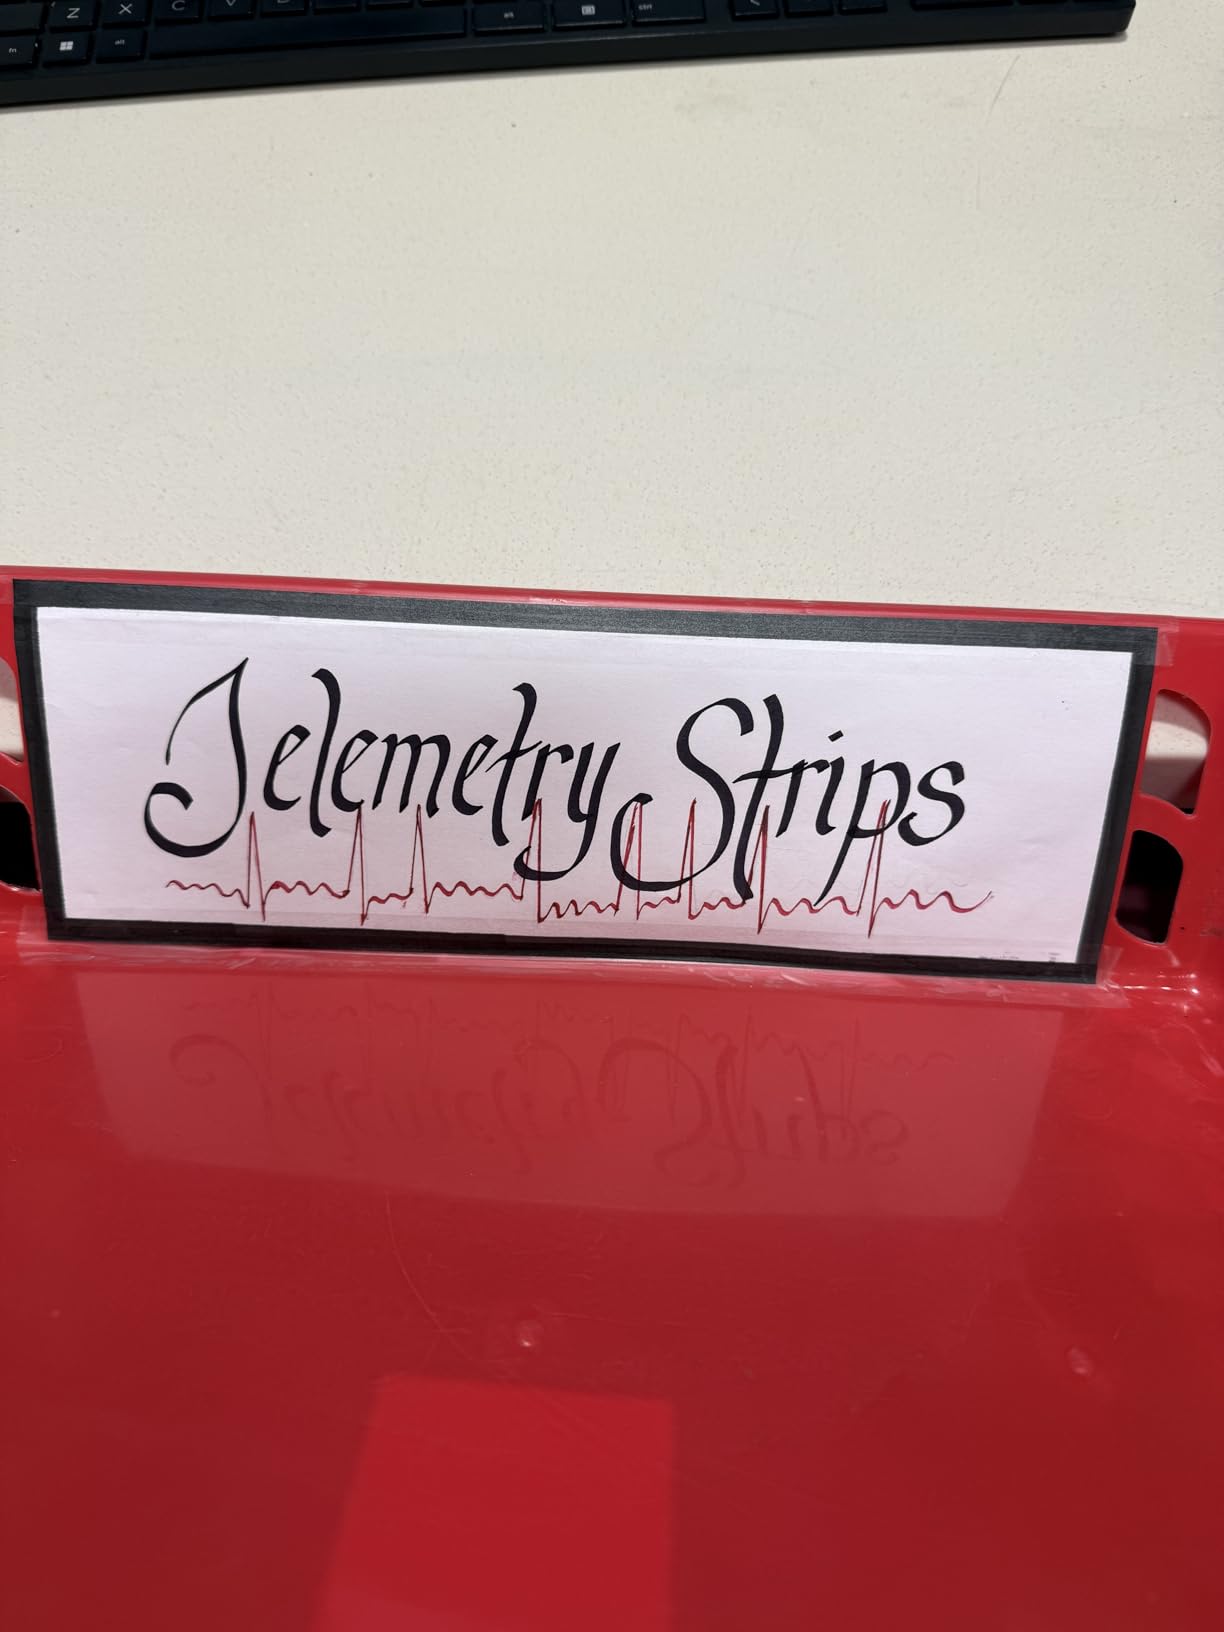
That extendability makes this kit useful beyond the first month. I practiced Italic script with the medium nib and saw clean lines that improved my confidence. The broad nib was harder to control at first, but the ink flow remained steady even when I applied uneven pressure.
That consistency is important for beginners who are still learning muscle control. You can trust the pen to behave predictably while you focus on your hand position.
What the Included Instructions Do Not Cover
The introduction booklet covers basic assembly but skips over posture, paper angle, and left-handed adjustments. I had to search online for those topics. If you are completely new to dip pens, plan to supplement the booklet with a few free video tutorials.
The ink pump mechanism is also not explained well. I recommend filling the pump with water first to understand how the suction works before inserting it into ink. This prevents messes and wasted ink during your first attempt.
The exercise booklet assumes you will write directly on its pages. As I mentioned, the paper is thin. I recommend copying the exercises onto separate practice paper rather than writing in the booklet itself.
This preserves the original examples for reference. You can keep the booklet as a guide while you fill separate pages with practice.
3. Kuretake ZIG Calligraphy Marker Pens 12 Colors – Bright Dual-Tip Markers
- 12 smooth vivid colors
- Dual tip for large and small letters
- Water-based blendable ink
- Excellent for practice without dip pens
- Great for professionals and beginners
- Some colors are weak on paper
- Can bleed through lighter paper
- May feel scratchy if dry
These Japanese markers changed how I think about practicing calligraphy. The 12-color set includes dual tips at 2mm and 3.5mm, which means you can write both small and large letters with the same pen.
I found the 3.5mm tip excellent for headers and the 2mm tip perfect for body text.
The colors are vivid and blendable. I used a water brush pen to create gradients between the blue and green markers, and the results were surprisingly smooth. The water-based ink is easy to clean up, which matters when you are practicing at a kitchen table that doubles as a workspace.
I practiced with these markers for two weeks straight and never felt the tips degrade. The square chisel shape is different from a brush tip, but it teaches the same thick-and-thin stroke principle. Beginners who find brush pens too soft often prefer the firm feedback these markers provide.
The color selection is well chosen. You get warm tones, cool tones, and a neutral black. I used the turquoise and green for botanical-themed lettering, and the orange and pink for greeting cards.
The colors are bright without being fluorescent, which keeps your work looking professional. The ink flow is generous. I never had to shake the pens or press hard to get consistent coverage.
The markers glide across smooth paper with a slight resistance that feels like writing with a firm fountain pen.
That feedback helps you learn pen control faster than with ultra-soft tips. The ink dries quickly on most papers. I tested it on five surfaces and saw minimal bleeding except on very thin notebook paper.
The colors that perform best are the darker shades. The grey, pink, and red can look weak on off-white paper, so choose your background color carefully. One of my favorite features is the ability to mix colors with water.
You can create custom shades by layering two colors and then brushing water over them. This technique adds a watercolor effect to your lettering without needing separate paint supplies. These markers are a favorite among Reddit calligraphy users for good reason.
They offer the control of a marker with the expressive range of calligraphy tools. If you want color in your practice without the mess of dip pens, this set is the best hand lettering kit for beginners who prioritize convenience. The square tips are easy to keep clean.
I wipe them with a damp cloth after each session and have not seen any ink buildup. The caps seal tightly, which prevents the pens from drying out during storage. I left one uncapped for five minutes by accident and the tip recovered after a few strokes.
That resilience is reassuring when you are still learning.
How the Dual Tips Improve Practice Efficiency
Switching between two tips on the same pen saves time and keeps your workspace organized. I found myself reaching for the 3.5mm tip when practicing individual letterforms and switching to the 2mm tip when writing full words.
This transition helped me understand how scale affects letter spacing. The square chisel tip is also more predictable than a brush tip. You know exactly where the ink will land, which reduces mistakes during practice.
I recommend these markers for beginners who get frustrated with the unpredictable behavior of soft brush pens. I used both tips on the same page to create a birthday card. The header used the larger tip and the message used the smaller one.
The consistency in ink color between the two tips made the card look planned and professional. That dual functionality is hard to find in other beginner sets. It removes the need to switch between multiple pens mid-project.
When to Use Water Mixing Techniques
The blendable ink opens up creative options that most beginner kits do not offer. I started using a water brush to fade the edges of my letters after about five days of practice. The technique is simple: write the letter, then touch a wet brush to the bottom edge and pull downward.
This works best on thicker watercolor paper. Standard copy paper will warp and pill when water is applied. If you want to explore this feature, buy a small pad of watercolor paper to keep alongside your regular practice sheets.
I also tried mixing two colors on a palette before writing. The ink blends easily with water, so you can create ombre effects within a single letter. This technique takes practice, but the markers make it accessible because the ink is already formulated to mix.
4. Speedball Elegant Writer Calligraphy 6 Marker Set – Affordable Marker Option
- Perfect for beginners and experts
- 3.0mm broad nib for sharp definition
- Acid-free and non-toxic
- Improved ink flow
- Easy to follow instructions
- Can bleed through thin paper
- Ink flow may be inconsistent
- More marker than traditional dip pen
This is the kit I wish I had found when I first started lettering. Six markers with a 3.0mm chisel nib cost less than most single brush pens.
The broad tip gives sharp definition that makes your letterforms look intentional even when your technique is still developing. I used the black marker daily for three weeks and the ink flow stayed consistent. The colors include blue, green, red, and two others that work well for decorative projects.
The acid-free, non-toxic ink means these markers are safe for scrapbooking and journaling. The instructions included in the package are easy to follow. I showed the quick-start guide to a ten-year-old and she produced readable italic letters within fifteen minutes.
That simplicity makes this set a strong choice for families or classrooms where multiple people will share the kit. The markers have a round barrel that feels comfortable in the hand. I wrote for forty-five minutes without hand fatigue.
The caps snap on securely, which is important when you are switching between colors frequently. I never lost a cap despite constant use. The improved ink flow is noticeable.
Older calligraphy markers I have used tend to blob at the start of a stroke. These release ink evenly from the first touch. That consistency is important when you are learning because you need to focus on letter shape, not ink management.
You can concentrate on the letterforms instead of babysitting the pen.

The broad nib is excellent for practicing thick downstrokes and thin upstrokes. I found the angle less forgiving than dual-tip markers, but more instructive. You learn quickly how pen position affects line width, which is a fundamental skill that transfers to every other calligraphy tool.
These markers do bleed through thin paper. I tested them on a Hobonichi planner and saw shadowing on the next page. Switching to a slightly heavier notebook or adding a blotter page underneath solves this completely.
The ink itself is high quality and does not feather on smooth surfaces. With nearly five thousand reviews, this is one of the most tested beginner calligraphy sets available. The community feedback consistently mentions reliability and ease of use.
I agree that this kit removes the financial barrier to trying hand lettering without sacrificing quality. I used the assorted colors to create a weekly planner header. The red and blue were bold, while the green was softer.
The markers layer well without muddying, so you can add decorative borders after writing the main text. That layering makes them more versatile than single-color practice pens. You can build complex designs with just the included colors.
Why the Broad Nib Teaches Better Habits
The 3.0mm chisel tip forces you to think about pen angle from the first stroke.
Unlike brush pens that flex with pressure, this marker requires you to rotate the barrel to change line width. I found this mechanical feedback helpful for understanding how traditional broad-edge pens work.
Once you learn the angle, your letterforms become more consistent. The marker is also firm enough to use on tracing paper without tearing it. I practiced over printed guidelines by placing a sheet of tracing paper on top, and the marker glided smoothly without snagging.
I recommend starting with the black marker and mastering the basic alphabet before adding color. The broad nib makes mistakes obvious, which is good for self-correction. When your downstrokes are uneven, you see it immediately and can adjust on the next letter.
Best Projects for This Marker Set
The included colors work well for envelope addressing, greeting cards, and journal headers. I used the black marker for addressing twenty envelopes and the nib stayed sharp through the entire batch. The other colors are bright enough for decorative accents and borders.
These markers are also excellent for creating practice drill sheets. I drew my own guidelines on blank paper and filled them with repeated strokes. The broad nib makes it easy to see whether your downstrokes are actually thicker than your upstrokes, which is a common beginner mistake.
I used the markers for a month of daily gratitude journaling. Each day I wrote the date in calligraphy and added a short note. The markers never dried out, and the colors stayed bright on the paper I used.
That durability makes them a practical choice for long-term projects. You can rely on them for daily use without worrying about the tips wearing down.
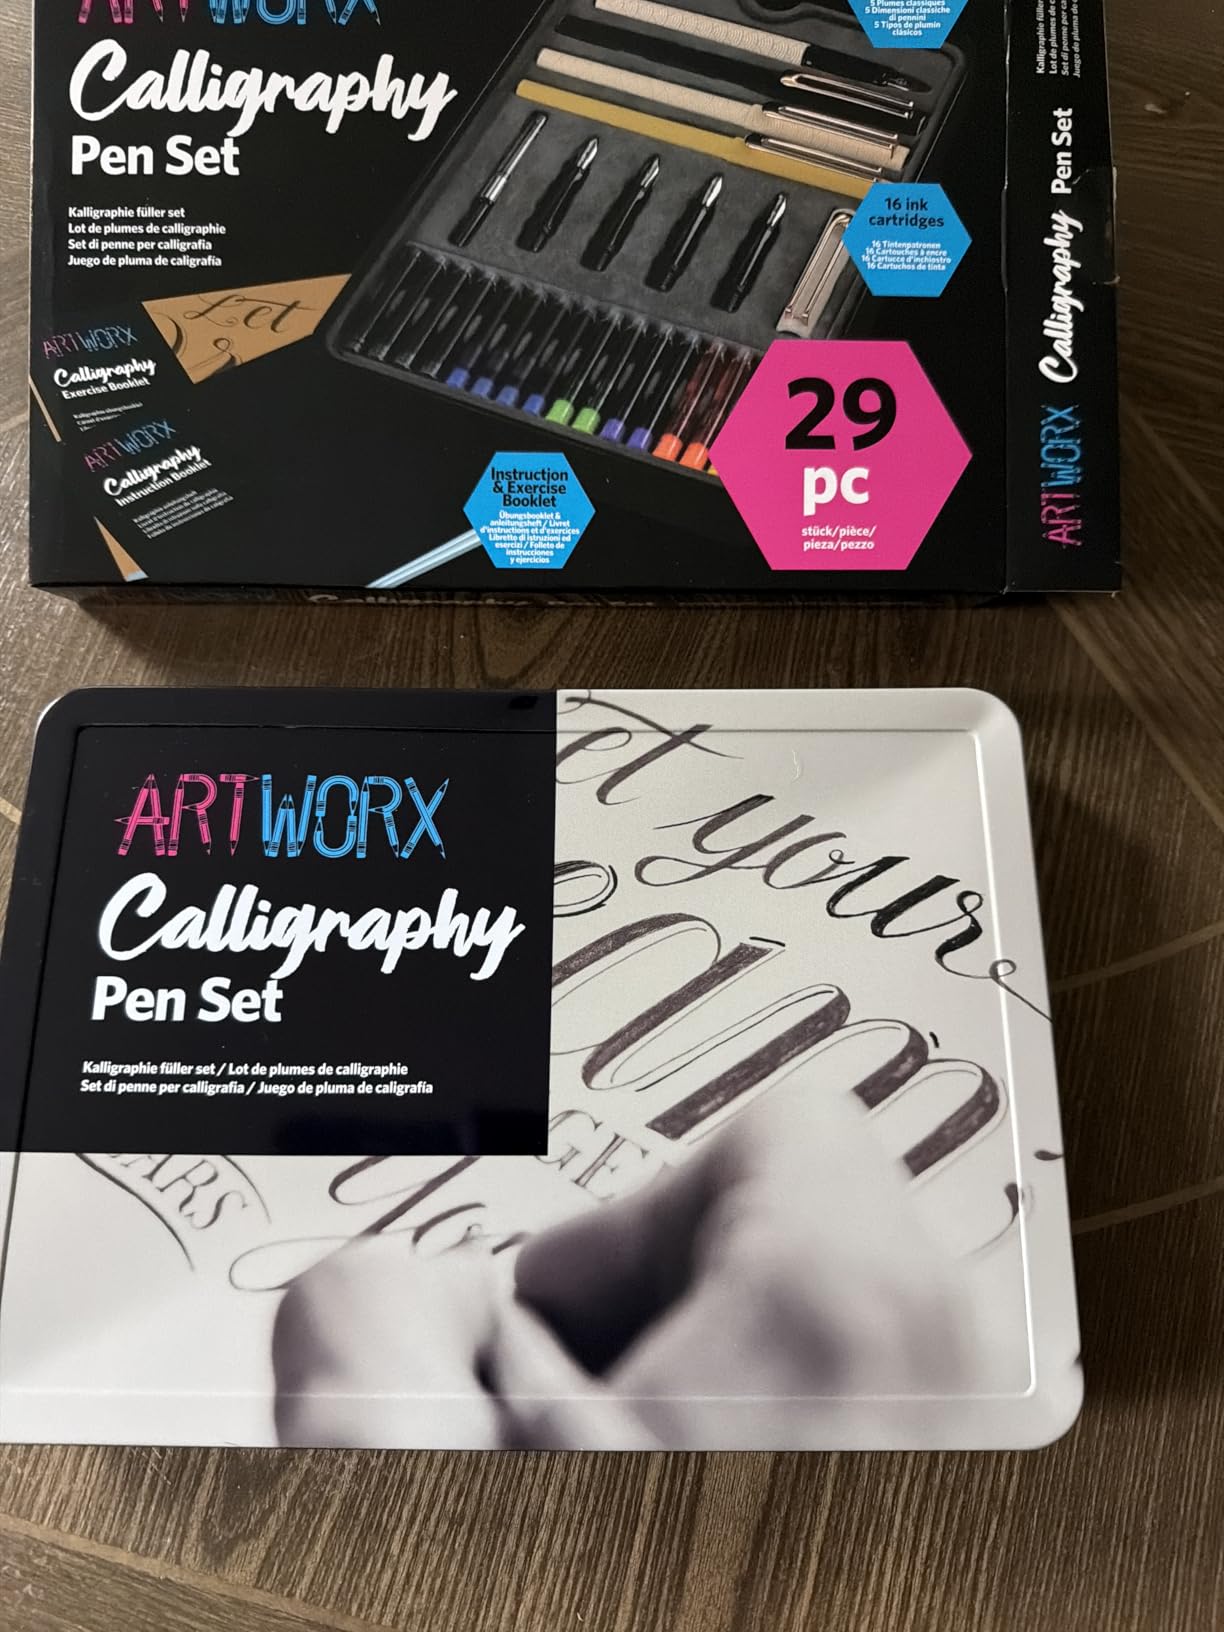
5. Artworx Calligraphy Pens Set – Fountain Pen Starter Kit
- Complete starter set with everything needed
- 5 different nib sizes for variety
- Premium comfortable writing experience
- Lovely tin packaging great for gifts
- Includes guide and practice booklet
- Instruction booklet may be in German
- Some instructions are vague
- Long shipping times of 1-2 months
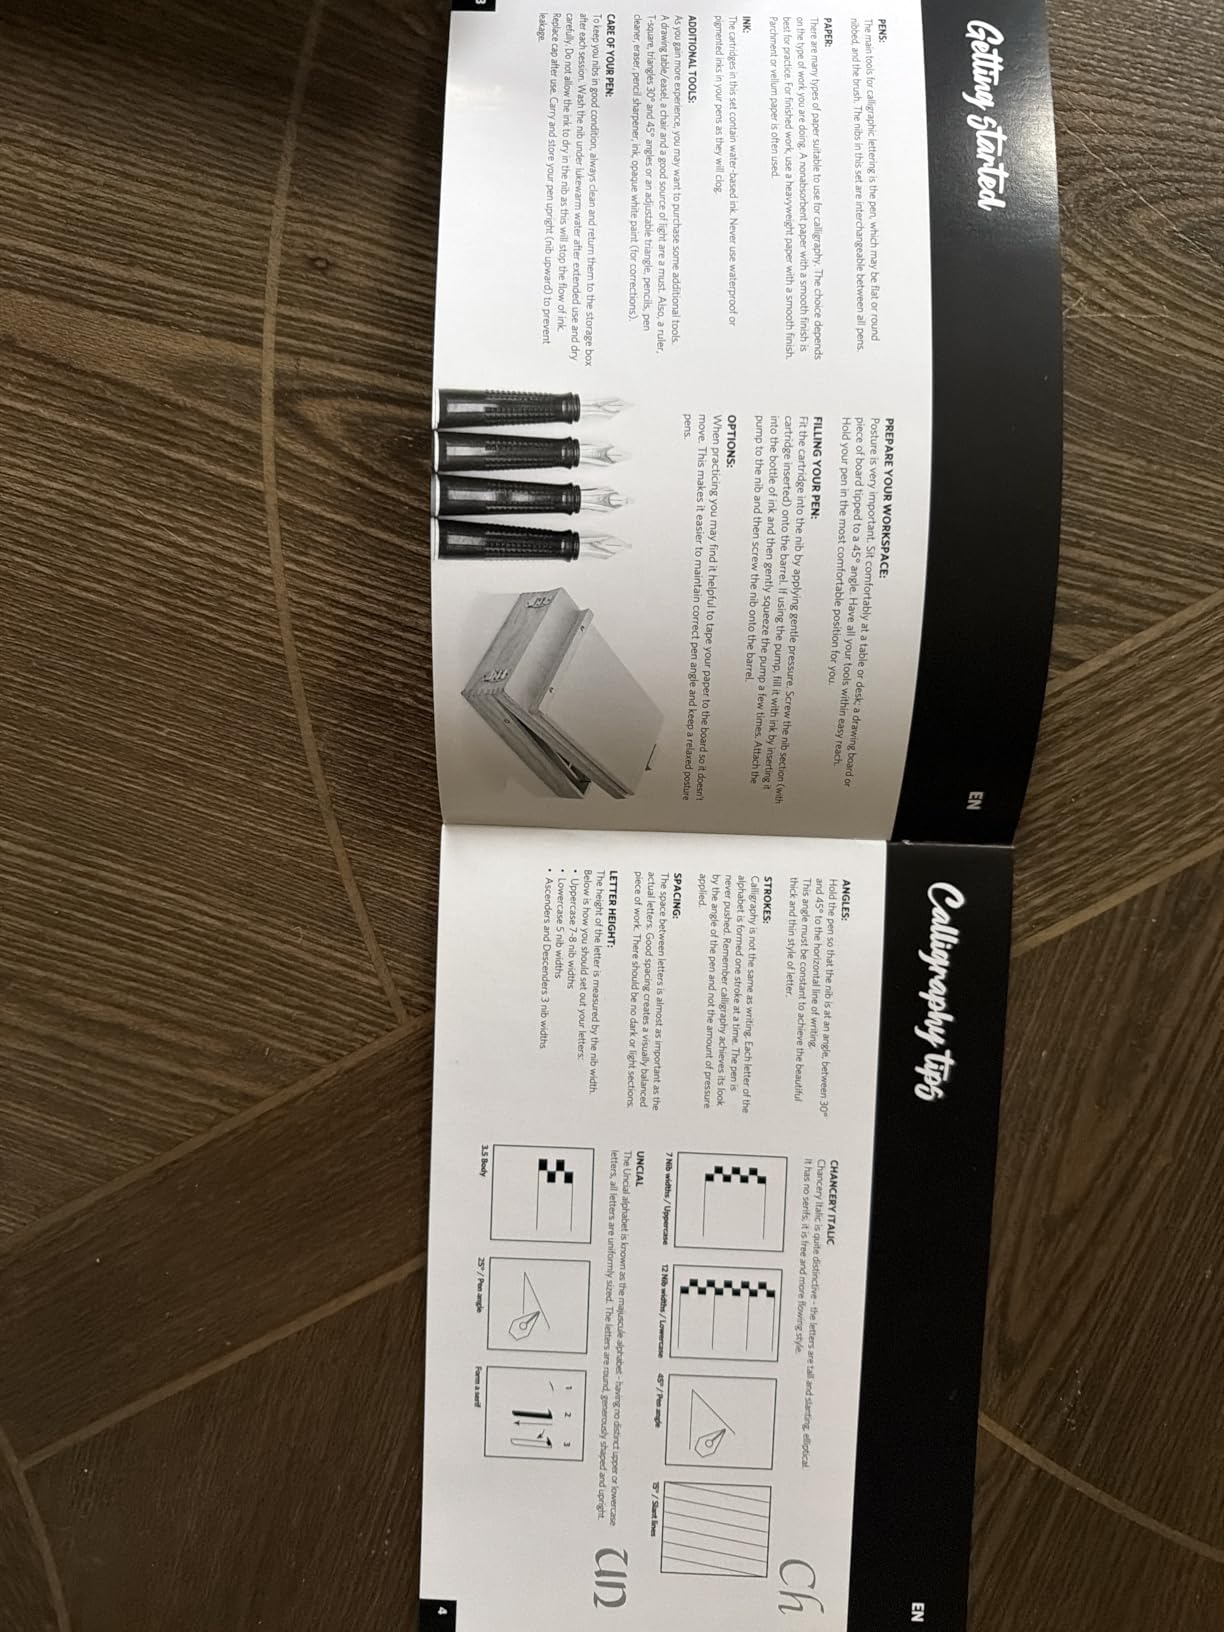
This set arrives in a tin box that looks like it belongs on a vintage desk. Inside are four fountain pens, five interchangeable nibs, sixteen ink cartridges, a pump for bottled ink, a guide book, and an eighteen-page exercise booklet. The presentation alone makes this a popular gift option.
I found the fountain pens comfortable to hold during long practice sessions. The smooth grip and balanced weight reduce hand fatigue, which is important when you are still building the muscle memory for consistent strokes. The five nib sizes range from fine to broad, giving you room to experiment.
The included guide book covers basic techniques. I noticed the instructions assume you know some calligraphy terminology already. A complete beginner might need to look up a few terms online.
The exercise booklet is straightforward enough to follow without much reading. The pens are made of metal with a smooth finish. They feel premium in the hand without being heavy.
I practiced for an hour at a time and never felt the pens dig into my fingers. The cylindrical shape is simple and functional, which is what you want when you are learning. The tin box is compact and closes tightly.
I carried it in a messenger bag for two weeks and the contents stayed in place. That portability is convenient for practicing on the go.
The nibs are held in a small foam insert that prevents them from rattling against each other. That attention to packaging detail protects the tools during travel. The ink cartridges are easy to insert once you figure out the mechanism.
I recommend pushing firmly until you hear a soft click. The first time I inserted one, I was too gentle and the ink did not flow properly. After correcting the angle, the pen wrote smoothly with even saturation.
The tin packaging is durable and keeps everything organized. I threw it in a backpack for a weekend trip and nothing shifted inside. That portability matters if you want to practice away from home without carrying a separate case.
The main drawback is shipping time. When I ordered this kit, it took six weeks to arrive. Plan ahead if you are buying this for a birthday or holiday gift.
The wait is worth it for the quality, but it is not a next-day impulse purchase. The pump for bottled ink is a useful addition. I tested it with a standard calligraphy ink and the flow was smooth.
The ability to refill from bottles means you are not locked into the included cartridge colors. That flexibility is rare in beginner kits at this price range.
How the Five Nib Styles Build Skill Gradually
The nibs are arranged in a progression that makes sense for beginners. I started with the finest nib and practiced basic strokes for three days before moving to the medium size. Each step up in width taught me something new about ink flow and pressure control.
The broadest nib is best for decorative headers and large alphabet practice. I used it for creating a single capital letter on a full page. The large scale made it easy to spot inconsistencies in my curves and angles.
Working big is a great way to correct bad habits early. I found the medium nib most useful for daily practice. It is wide enough to show the thick-and-thin contrast, but narrow enough to write full words on standard paper.
After two weeks with the medium nib, I felt ready to try the broad nib without feeling overwhelmed. That gradual progression builds confidence systematically.
What to Know About the Instruction Language
Some buyers report that the instruction booklet ships in German. I received an English version, but the inconsistency is worth noting. The illustrations are clear enough that you can follow them without reading the text.
Still, if you prefer verbal explanations, you might want to supplement with a free online course. The exercise booklet is more useful than the guide book in my experience. It contains traceable letterforms that you can copy directly.
I completed the entire booklet over two weeks and then started the same exercises again on blank paper. The repetition built confidence quickly. If you do receive a German booklet, search for the Artworx calligraphy tutorial series online.
The same diagrams are explained in English on several video platforms. I found a ten-minute video that covered the entire setup process faster than the printed guide.
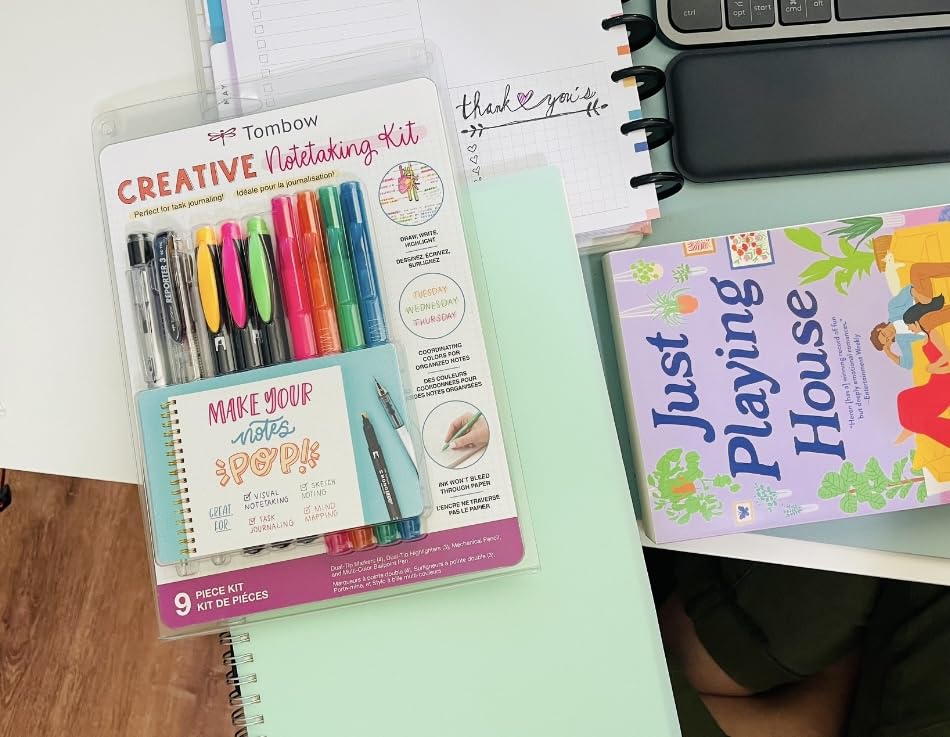
6. Tombow 56301 Creative Notetaking Kit – Journaling-Focused Set
- Dual-tip markers for versatile writing
- Great ink colors that stand out
- Mechanical pencil with shake advancement
- Multi-color ballpoint pen included
- Excellent for note-taking and journaling
- No eraser included
- Not suitable for professional art inking
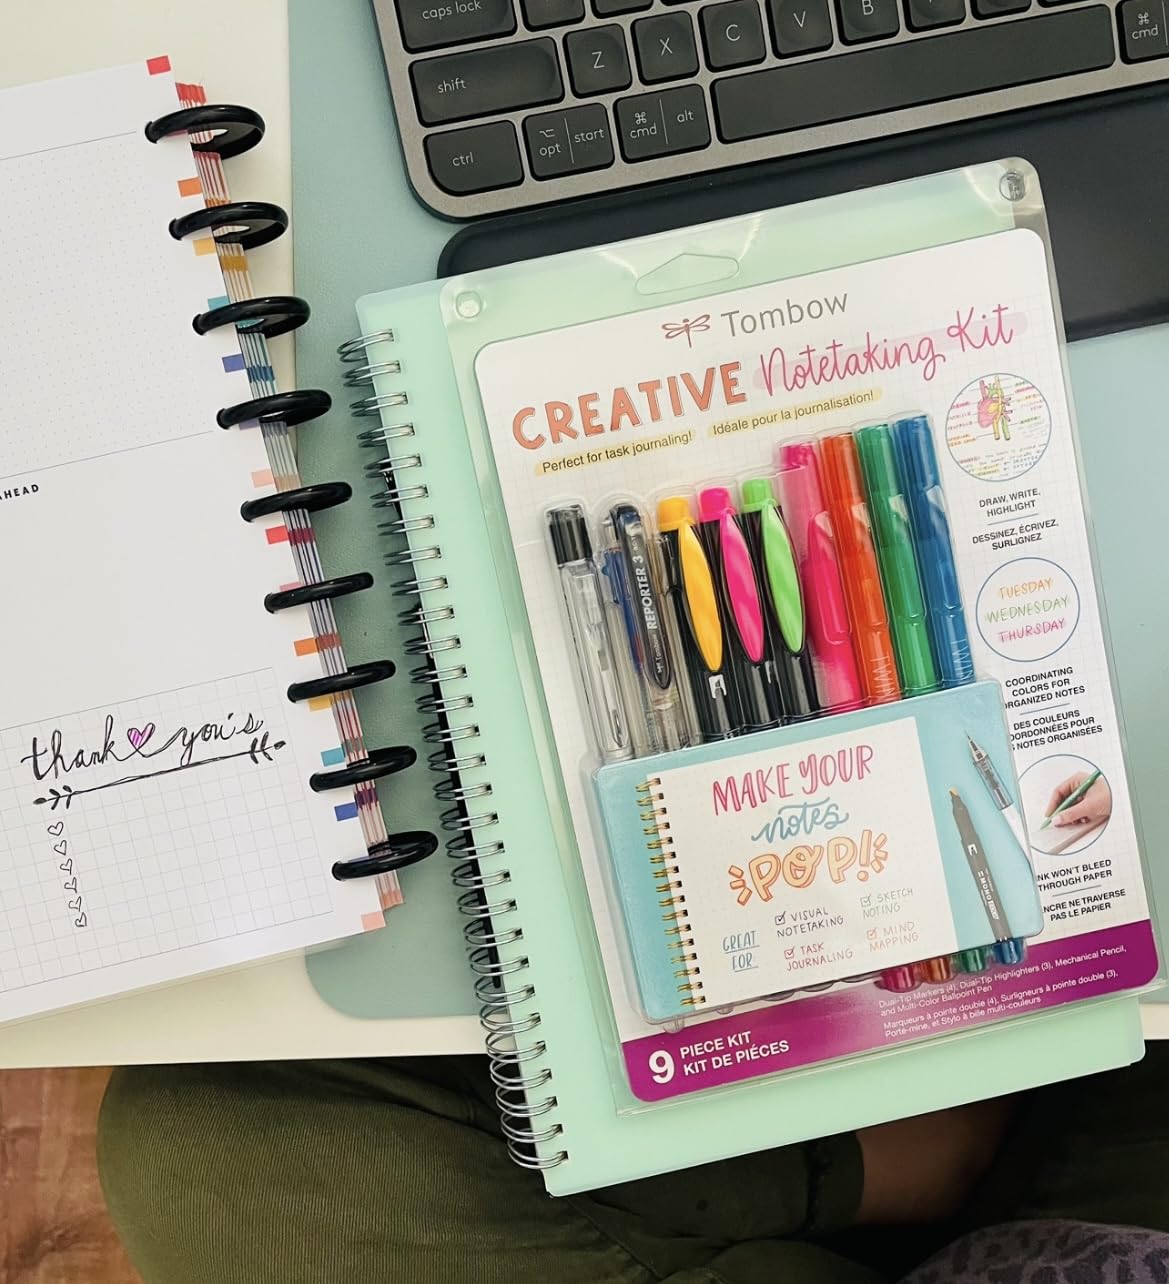
This kit is not a traditional calligraphy set, but it belongs on this list for a specific reason. Many beginners discover hand lettering through journaling and planner decoration. The Tombow Creative Notetaking Kit bridges that gap perfectly with tools that work for both functional writing and decorative lettering.
The four TwinTone dual-tip markers are the highlight. One end draws a fine line, while the other creates a broader stroke. I used the broad end for headers and the fine end for body text in my bullet journal.
The colors are coordinated so your spreads look planned without much effort. The MONO Graph mechanical pencil has a shake-to-advance feature that I found addictive. I used it for sketching letter layouts before inking them with the markers.
The pencil lead is dark enough to see clearly but light enough to erase cleanly. The kit does not include an eraser, which is a minor oversight. The included Reporter 3 multi-color ballpoint pen is surprisingly useful.
I used it for color-coding tasks and margin notes. The black, red, and blue inks are standard. The convenience of having all three in one barrel saves desk space.
I found myself reaching for it more than I expected. The highlighters are angled for both broad highlighting and fine underlining. I used them to add color blocks behind my letterforms, creating a layered effect that looks complex but takes seconds.
The ink is translucent enough that you can read the text underneath. This layering technique adds depth to your journal spreads without obscuring the content.
The ink from the markers dries quickly. I never smudged a finished page even when I closed my journal immediately after writing. There was no transfer to the facing page.
The Reporter 3 pen is useful for color-coding notes and cross-referencing. While it is not a calligraphy tool, it completes the set in a way that makes sense for journalers. It sits naturally next to your planner.
I tested this kit alongside a standard planner for thirty days. The markers did not bleed through the paper, and the colors stayed vivid. If your goal is to add decorative lettering to your daily organization, this is the best hand lettering kit for beginners who journal.
The pencil lead is 0.5mm, which is thin enough for detailed sketching.
I drew letterforms at half size before scaling them up with the markers. That planning step improved my spacing and alignment. The mechanical pencil is a serious tool, not a throwaway freebie.
It feels like a quality instrument in your hand.
How the Coordinated Colors Simplify Layout Design
The four marker colors are chosen to work together. I created a full weekly spread using only the included pink, orange, green, and turquoise. The results looked intentional and harmonious.
Beginners often struggle with color theory, so having a curated palette removes one decision from the process. The highlighters match the marker tones, which means you can create backgrounds and headers in the same color family.
I used the pink marker for a Monday header and the pink highlighter for a background wash. The consistency made my pages look more polished than when I use random colors. I tried adding a fifth color from another brand and the page immediately looked less cohesive.
The curation in this kit is its hidden strength. You learn about color relationships by using the included set, which is a valuable design lesson for beginners.
When to Upgrade to Dedicated Calligraphy Tools
This kit excels at decorative writing but it will not teach you traditional calligraphy scripts. The tips are firm markers, not flexible brush pens. If you want to learn Copperplate or Spencerian, you will eventually need a dip pen or a soft brush pen.
I recommend treating this as a gateway kit. Use it for six months to build the habit of slow, deliberate lettering. Once you enjoy the process, invest in a dedicated brush lettering or dip pen kit.
The skills you build here transfer directly to more advanced tools. The fine tips in this set are excellent for faux calligraphy. That technique involves drawing thick downstrokes manually rather than relying on pen pressure.
It is a legitimate lettering style that looks professional. Many journalers never move past faux calligraphy because it produces beautiful results with simple tools. You can create stunning work without ever upgrading.
7. Speedball Basic Calligraphy Set 7 Piece – Traditional Dip Pen Starter
- Great variety of nibs for beginners
- Quality hand-crafted nibs with smooth flow
- Triple reservoir for increased ink capacity
- Flexible points for maximum control
- Includes helpful instruction book
- Packaging can be difficult to open
- Nibs are not professional-grade
- Requires separate ink and paper purchase
This is the classic beginner dip pen set that calligraphy teachers have recommended for decades. It includes six nibs and one standard holder. The nibs are C-style with triple reservoirs, which means they hold more ink than standard nibs and produce longer strokes without dipping.
I used this set for a full week of evening practice. The first session was messy because I had never used a dip pen before. By the third session, I was dipping less frequently and controlling the ink flow better.
The learning curve is real, but the results are more satisfying than marker-based practice. The instruction book is genuinely helpful. It explains how to insert the nib, how to dip at the correct depth, and how to hold the pen at the right angle.
I kept it open next to my practice pad for the first five sessions. The guidance prevented many common beginner mistakes. The holder is lightweight and straightforward.
It does not have an oblique flange, which means both left and right-handed users can hold it comfortably. I found the smooth surface easy to grip. I added a small rubber band after the first session for extra traction.
The six nibs are clearly labeled and organized in a foam insert. I could see the size differences at a glance. The set includes C1, C2, C3, C4, and two additional points.
That range covers everything from small text to large decorative headers. The nibs are hand-crafted and provide smooth ink flow. I tested them with Sumi ink and saw no skipping or blobbing.
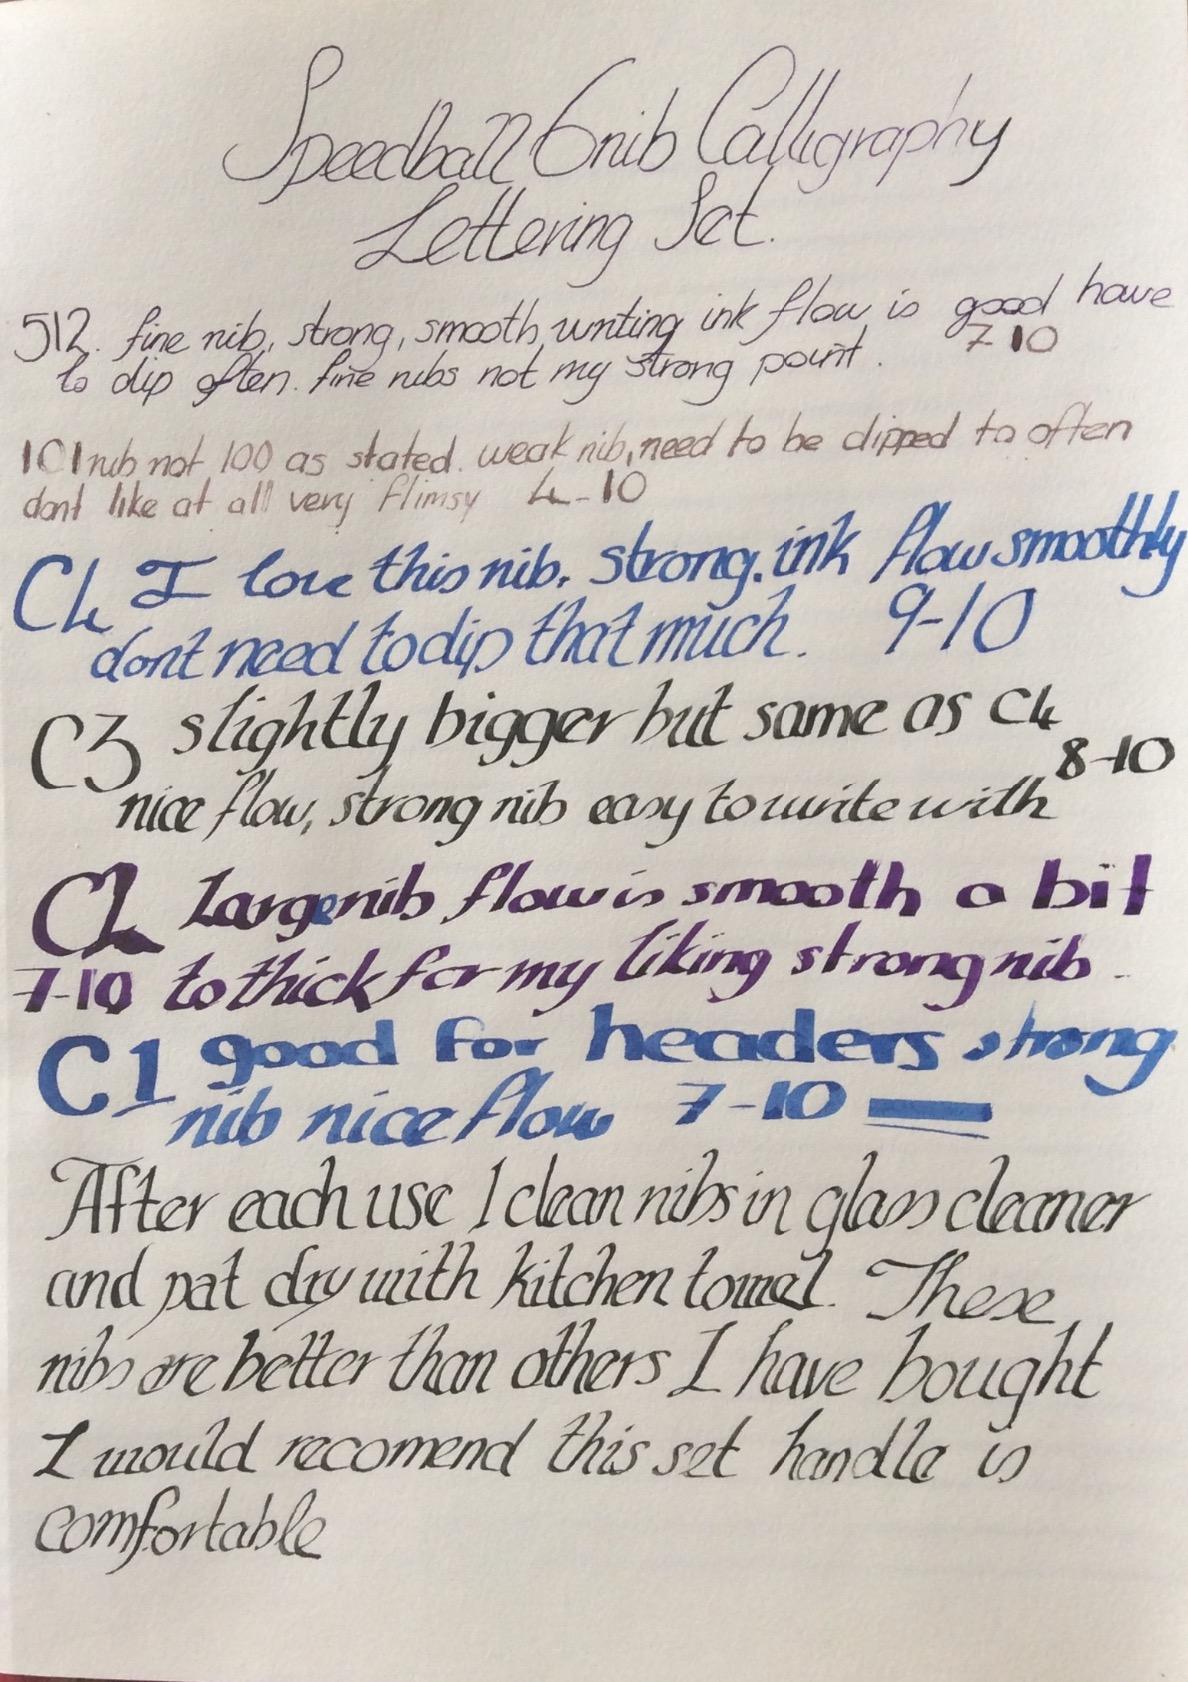
The flexible points let you vary line width by changing pressure, which is the core skill of pointed pen calligraphy. The feedback from the metal nib is precise and immediate. This set is ambidextrous and works for both left and right-handed users.
I am left-handed and appreciated that the holder did not force my hand into an uncomfortable position. The grip is smooth. You might want to add a rubber band or cushion if you have hand strength issues.
The packaging is notoriously difficult to open. I needed scissors and patience to extract the nibs without dropping them. Once opened, I stored everything in a small plastic box instead of the original blister pack.
Consider this a one-time inconvenience rather than a dealbreaker. The nibs need occasional cleaning. I rinsed them in water after each session and dried them with a cloth.
Proper maintenance keeps the ink channels clear and prevents rust. The instruction book mentions cleaning briefly, but I recommend cleaning immediately after every practice. A quick rinse takes thirty seconds and protects your investment.
Why the Triple Reservoir Matters for Beginners
The triple reservoir design holds more ink than single-reservoir nibs. For beginners, this means fewer interruptions and less frustration. I counted my strokes during practice and got twelve to fifteen letters per dip with the larger C3 nib.
That flow consistency helps you focus on letterforms instead of ink management. The reservoirs also prevent the ink from blobbing at the start of a stroke. I had that problem with another dip pen I tried, and it ruined the thin upstrokes.
The Speedball nibs release ink evenly from the first touch to the last, which makes your practice more productive. I tested the C1 nib for small text and got twenty letters per dip. The smaller nib holds less ink, but the triple reservoir still outperforms single-reservoir designs.
That efficiency means you spend more time writing and less time dipping. It keeps your rhythm intact during practice. You can maintain your flow state without constant interruptions.
What Additional Supplies You Need to Buy
This kit does not include ink or paper. You will need to buy those separately before you can start practicing. The forums I checked recommend Sumi ink for beginners because it is dark, water-based, and easy to clean.
A small bottle lasts for months of daily practice. For paper, avoid anything textured. Smooth practice pads like Rhodia dot pads or Canon Marker Paper work best.
I also recommend buying a cheap drafting pencil for drawing guidelines. The pencil lines erase cleanly and help you keep your letters level while you learn. A blotter paper is also useful.
I keep a sheet under my practice page to absorb excess ink. This prevents the ink from bleeding onto the table or onto the next sheet. The extra supplies add a small cost, but they protect your workspace and improve your results.
Buying Guide for Hand Lettering Beginners
Choosing your first kit is less about finding the perfect tool and more about matching the kit to your goals. The following factors will help you decide which set belongs in your shopping cart.
Kit Type vs Learning Style
Marker-based kits like the June & Lucy or Kuretake sets are best for beginners who want immediate results. You open the box and start writing within minutes. Dip pen kits like the Speedball Basic Set require more setup and cleanup.
They teach you the traditional mechanics that underlie all lettering styles. Fountain pen kits like the Mont Marte and Artworx sets occupy a middle ground. They feel more formal than markers but avoid the mess of dipping.
If you want a kit that travels well and works at a coffee shop, fountain pens are the practical choice. Journalers should consider the Tombow kit first. It teaches decorative lettering within the context of daily use.
You are more likely to practice if the tools are already sitting on your desk next to your planner.
Paper and Practice Materials
The paper you use matters as much as the pens. Cheap paper will ruin your experience by causing bleeding, feathering, and rough strokes. The community consensus from Reddit and other forums strongly favors Rhodia dot pads and Canon Marker Paper for beginners.
Rhodia dot pads have a smooth surface with subtle grid dots that help you align letters without heavy guidelines. Canon Marker Paper is thin, smooth, and shows ink behavior clearly. Both papers are affordable enough to use daily without guilt.
Many experienced practitioners recommend starting with pencil practice before using any ink. A simple mechanical pencil lets you learn letter shapes and spacing without the pressure of permanent ink. The Tombow kit includes a quality pencil, which is one reason it works well for true beginners.
Left-Handed Considerations
Left-handed writers face a unique challenge in calligraphy. Most instruction assumes a right-handed grip, and some nib holders are angled specifically for right-handers. The Speedball Basic Set uses a straight holder that works for both orientations.
If you are left-handed, avoid oblique holders until you understand the basics. The straight holder in the Speedball set lets you find your own comfortable angle. You may also want to place your paper more vertically than right-handed examples show.
This reduces smudging as you write. Brush pens and markers are generally more left-hand-friendly than dip pens because they do not require the same hand position. The Kuretake and June & Lucy kits are both excellent choices for left-handed beginners who want to skip the dip pen learning curve entirely.
Premade Kit vs Building Your Own
Some experienced calligraphers recommend buying individual supplies instead of premade kits. While that approach works for people who already know what they want, it can overwhelm beginners. Our testing confirmed that a well-curated kit saves money and confusion during the first month.
The Mont Marte 32-Piece Set is the best example of why kits make sense. Buying four pens, five nibs, and twenty cartridges separately would cost more than the set. The included booklets add structure that random purchases lack.
Once you finish your first kit, you will know exactly what to buy next. The second purchase is where you start customizing. Your first purchase should be about getting started without analysis paralysis.
Common Mistakes to Avoid
Beginners often press too hard. Light pressure produces better results, especially with brush pens and dip nibs. I spent my first week bearing down on every stroke and wondered why the tips snagged.
Relaxing my grip improved my letterforms immediately. Another common mistake is practicing on the wrong paper. Textured paper catches the nib and creates ragged lines.
Smooth paper is always better, even if it costs slightly more. The paper investment pays off in cleaner strokes and less frustration. Finally, do not skip the basic stroke drills.
They look boring, but they build the muscle memory that makes letters possible. I spent three days doing nothing but straight lines and ovals before writing my first full alphabet. Those drills were the reason my letters looked intentional rather than accidental.
Frequently Asked Questions
What is the best calligraphy starter kit?
The best calligraphy starter kit depends on your learning style. For workbook-driven practice, the June & Lucy Calligraphy Kit provides structured lessons with six marker pens. For a complete all-in-one experience, the Mont Marte 32-Piece Set includes traditional nibs, ink cartridges, and practice booklets. Both are excellent for beginners in 2026.
What lettering styles are best for beginners?
Modern calligraphy and brush lettering are the most beginner-friendly styles. They require less precise nib control than traditional scripts like Copperplate or Gothic. Starting with broad-edge markers or brush pens lets you practice thick and thin strokes before moving to dip pens.
What pens are good for beginner hand lettering?
Brush pens and chisel-tip markers are the easiest tools for beginners. The June & Lucy markers and Kuretake ZIG pens both offer controlled tips that respond to pressure. Fountain pen sets like the Mont Marte and Artworx kits are also good for beginners who want a more traditional feel without the mess of dip pens.
What are some hand lettering projects for beginners?
Start with simple daily practice drills like alphabet sets and repeated strokes. Then move to addressing envelopes, creating journal headers, writing greeting cards, and making decorative quotes. These projects build confidence while keeping the scale small enough to finish in one session.
Final Thoughts
The best hand lettering kits for beginners share one quality: they make practice enjoyable enough that you keep going. The June & Lucy kit leads our list because the workbook removes the guesswork from daily practice. The Mont Marte set offers unmatched value for beginners who want to explore traditional styles.
The Speedball Elegant Writer markers prove that you do not need to spend a lot to start. Choose the kit that matches your personality. If you love structure, get the workbook.
If you love variety, get the 32-piece set. If you journal daily, start with the Tombow kit. The tools are less important than the habit of regular practice.
Pick one kit from this 2026 guide and start with ten minutes today. Your letters will improve faster than you expect.