
Understanding wet on wet vs wet on dry watercolor techniques is the foundation of mastering this beautiful medium. These two approaches create completely different effects, and knowing when to use each one will transform your paintings from frustrating experiments into controlled expressions of creativity.
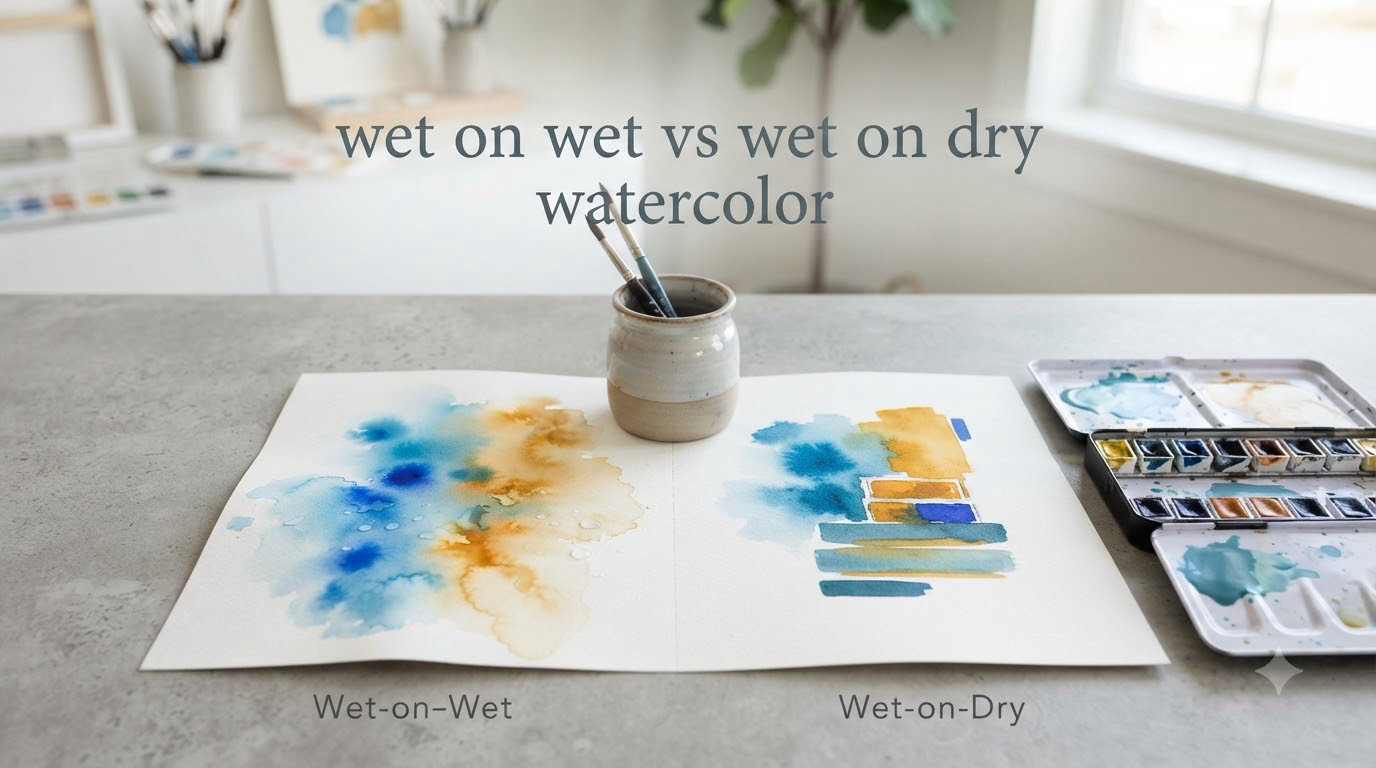
After teaching watercolor classes for over eight years, I have watched hundreds of beginners struggle with the same question: why does my painting not look like the tutorial? The answer almost always comes down to paper wetness. Wet on wet means applying wet paint to wet paper, creating soft, flowing edges and unpredictable blends. Wet on dry means applying wet paint to dry paper, giving you sharp edges and precise control.
In this guide, I will walk you through both techniques step by step. You will learn the six stages of paper wetness, how to troubleshoot common problems like backruns and blooms, and when to combine both methods for professional results. Whether you are picking up a brush for the first time or looking to add more control to your work, this article will give you the practical knowledge you need.
Table of Contents
Wet on Wet vs Wet on Dry Watercolor: Quick Comparison
Before diving into the details, here is how these two fundamental techniques compare at a glance.
| Characteristic | Wet on Wet | Wet on Dry |
|---|---|---|
| Edges | Soft, blurred, feathered | Sharp, defined, crisp |
| Control Level | Low to medium | High |
| Best For | Backgrounds, skies, clouds, atmospheric effects | Details, fine lines, realistic work, sharp shapes |
| Skill Level | Intermediate to advanced | Beginner friendly |
| Drying Time | Slower (paper is wet) | Faster |
| Common Effects | Blooms, backruns, gradients | Flat washes, glazing, layering |
What Is Wet on Wet Watercolor Technique?
Wet on wet watercolor is a technique where you apply wet paint to paper that has already been dampened with clean water. The paint spreads and diffuses across the wet surface, creating soft edges and organic color blends that are difficult to achieve any other way.
The science behind this technique is simple but fascinating. Watercolor paper contains countless tiny fibers that absorb moisture. When you wet the paper first, those fibers swell and create channels for the pigment to travel. The paint follows the water, moving across the surface in ways that are partially predictable and partially magical.
I remember the first time I watched wet on wet work its magic. I had dampened my paper and dropped in a pool of ultramarine blue. Within seconds, the color spread outward in a perfect gradient, fading from deep saturated blue at the center to almost nothing at the edges. That moment hooked me on watercolor.
Visual Characteristics of Wet on Wet
Paintings created with wet on wet technique have a distinctive look. You will see soft, feathered edges where colors meet instead of hard lines. Colors blend into each other seamlessly, creating smooth transitions that look almost airbrushed.
The technique produces what artists call “happy accidents.” Paint flows where gravity and capillary action take it, sometimes creating beautiful effects you did not plan. This unpredictability is both the joy and the challenge of wet on wet painting.
Common visual effects include blooms (also called cauliflowers or blossoms), which are organic flower-like patterns that form when wet paint meets wetter paint. You will also see backruns, which happen when a more concentrated pigment pushes into a wetter area, creating dark edges with lighter centers.
Best Use Cases for Wet on Wet
Wet on wet shines when you want atmospheric, dreamy effects. I use it almost exclusively for painting skies, clouds, and distant backgrounds where sharp details would look out of place.
Here are the specific situations where wet on wet works best:
- Skies and atmospheric backgrounds: The soft gradients perfectly capture the way light diffuses through air.
- Clouds: Natural cloud formations have soft edges that wet on wet creates effortlessly.
- Water and reflections: The flowing nature of wet paint mimics the movement of water.
- Underpainting: Establishing a loose, colorful foundation before adding details.
- Foliage and natural textures: Leaves, grass, and trees often look better with soft, undefined edges.
How to Paint Wet on Wet: Step by Step
Follow these steps to execute the wet on wet technique correctly.
Step 1: Tape your paper to a board. Wet paper buckles, so securing it prevents problems later.
Step 2: Apply clean water evenly across the area you want to paint. Use a large soft brush or spray bottle. The paper should look shiny but not have standing puddles.
Step 3: Wait for the right stage of wetness. This is critical. You want the paper to reach the “glistening” stage where it looks damp but the shine is starting to fade slightly.
Step 4: Mix your paint with enough water to create a flowing consistency. The paint should be wetter than you would use for dry paper work.
Step 5: Touch your brush to the wet paper and watch the paint spread. Work quickly because the paper is changing as it dries.
Step 6: Add additional colors by dropping them into the wet paint. Let the colors blend naturally rather than brushing them together aggressively.
Step 7: Tilt your board if you want the paint to flow in a specific direction. Gravity can be your friend for creating gradients.
What Is Wet on Dry Watercolor Technique?
Wet on dry watercolor is the technique of applying wet paint directly to dry paper. This is the most controlled approach and the one I recommend beginners start with.
When you paint on dry paper, the pigment stays exactly where you put it. The paint dries quickly, creating sharp edges and defined shapes. You have complete control over every brushstroke, which makes this technique ideal for detailed work.
In my early classes, I always have students practice wet on dry first. It builds the brush control and confidence needed before tackling the more unpredictable wet on wet method. The skills you develop here transfer directly to more advanced techniques.
Visual Characteristics of Wet on Dry
Wet on dry paintings have a very different appearance than wet on wet work. Edges are crisp and well-defined. Colors stay where you place them without bleeding into neighboring areas.
You can create precise lines, sharp corners, and controlled shapes. The technique allows for layering because each wash dries completely before you add the next. This builds depth through glazing, where transparent layers create rich, complex colors.
Flat washes are achievable with wet on dry, creating areas of solid, even color. Graduated washes transition smoothly from dark to light with practice. Variegated washes allow multiple colors to sit side by side without mixing.
Best Use Cases for Wet on Dry
Wet on dry is my go-to technique when precision matters. It excels in situations where soft edges would look messy or unprofessional.
Here is where wet on dry works best:
- Details and fine lines: Tree branches, architectural elements, facial features, and text.
- Realistic subjects: Portraits, still life, and anything requiring accurate representation.
- Sharp shapes: Geometric patterns, hard shadows, and defined objects.
- Layering and glazing: Building complex colors through multiple transparent washes.
- Controlled backgrounds: When you need a solid color that does not vary.
How to Paint Wet on Dry: Step by Step
Master wet on dry with this straightforward process.
Step 1: Start with completely dry paper. If you have taped it down from a previous session, make sure it is fully dry.
Step 2: Mix your paint to the right consistency. For most wet on dry work, you want a creamy consistency that flows but is not watery.
Step 3: Load your brush with paint. The amount depends on the size of the area you are covering.
Step 4: Apply the paint to dry paper using confident strokes. The paint will stay exactly where you put it.
Step 5: For larger areas, work quickly to maintain a wet edge. Paint in sections, connecting each new stroke to the still-wet previous stroke to avoid hard lines.
Step 6: Let each layer dry completely before adding another. This prevents the colors from mixing unintentionally and creating mud.
Step 7: Build up layers gradually. Watercolor is transparent, so each layer affects the final appearance.
The Six Stages of Paper Wetness
Understanding paper wetness is the key to controlling watercolor. The same technique produces wildly different results depending on exactly how wet your paper is.
After years of teaching, I developed this six-stage system to help students understand what is happening on their paper. Learning to recognize these stages will transform your painting from guesswork to intention.
Stage 1: Fully Wet (Soaking)
The paper has visible puddles or a thick layer of water. Paint dropped here will spread wildly, creating blooms and backruns. This stage is good for dramatic effects but hard to control.
Stage 2: Shiny Wet
Water has been absorbed but the surface still has a strong shine. Paint flows freely here, creating soft edges and smooth blends. This is the classic wet on wet stage.
Stage 3: Glistening (Satin)
The shine is softer, like satin. The paper feels damp but not soaking. This is my favorite stage for controlled wet on wet work. Paint still flows but with more predictability.
Stage 4: Moist (Matte Damp)
No visible shine, but the paper still feels cool to the touch. Paint spreads slowly here, creating semi-soft edges. Good for subtle effects.
Stage 5: Damp
The paper feels slightly cool but is nearly dry. Paint will spread only slightly, creating almost hard edges. This transitional stage requires quick work.
Stage 6: Bone Dry
Completely dry paper at room temperature. Paint stays exactly where you put it. This is the wet on dry stage.
How to Test Paper Wetness
Use these methods to check your paper.
Visual check: Look at the surface under light. Shiny means wet. Satin means glistening. Matte means damp or dry.
Touch test: Gently touch the back of your hand to the paper. Cool means damp. Room temperature means dry.
Timing: On average paper, the transition from wet to dry takes 5 to 15 minutes depending on humidity, temperature, and paper thickness.
Combining Wet on Wet and Wet on Dry Techniques
Most successful watercolor paintings use both techniques. Knowing how to layer them creates paintings with depth and interest that single-technique work cannot achieve.
I typically start with wet on wet for backgrounds and atmospheric effects. Once that layer dries completely, I switch to wet on dry for details and sharp elements. This workflow gives me the best of both worlds.
If you are looking for more art supplies and techniques to expand your practice, understanding how these methods work together is essential.
Recommended Workflow
Here is the workflow I teach my students for mixed-technique paintings.
Step 1: Start with a wet on wet underpainting. Establish your sky, background, or atmospheric foundation.
Step 2: Let the painting dry completely. This might take 30 minutes or longer depending on paper thickness and humidity.
Step 3: Add middle-ground elements using wet on dry. These should be more defined than your background but not as sharp as foreground details.
Step 4: Dry again completely.
Step 5: Add foreground details using wet on dry with a fine brush. This creates the sharpest elements that appear closest to the viewer.
Step 6: Optional final touches. Some artists add a final wet on wet glaze to unify colors or soften edges that became too harsh.
When to Switch Techniques
Switch techniques based on what you are painting.
Use wet on wet when you want elements to recede into the background or when painting atmospheric, natural effects. Use wet on dry when you need something to come forward or when painting man-made, detailed subjects.
The key is patience. Never rush the drying phase. Painting wet on dry over damp wet on wet work creates mud and destroys both layers.
Troubleshooting Common Problems
Every watercolor artist has faced frustrating results. Here are the most common issues and how to fix them.
Backruns and Blooms
Backruns (also called blooms or cauliflowers) happen when wetter paint meets drier paint. The wetter area pushes into the drier area, creating those characteristic flower-like patterns with dark edges.
These can be beautiful if intentional, but frustrating when they appear unexpectedly.
To prevent backruns: Keep your paper at a consistent wetness level. Do not add very wet paint to paper that is drying. Work quickly so edges stay wet while you are painting.
To fix backruns: If caught early, you can sometimes lift them with a damp brush or paper towel. Once dry, you may be able to paint over them or incorporate them into your design.
Paper Dries Too Fast
This is one of the most common complaints I hear from beginners, especially in dry climates.
Solutions: Work smaller so you finish before drying. Use thicker paper which stays wet longer. Work in a more humid environment if possible. Have a spray bottle ready to re-wet areas. Work on multiple paintings simultaneously so you can switch while one dries.
Colors Become Muddy
Muddy colors usually happen when you mix too many colors together or when you paint over damp layers.
Prevention: Limit your palette to a few colors. Let each layer dry completely before adding the next. Understand color theory so you know which pigments create mud when mixed.
Paint Does Not Flow
If your paint sits on the paper without moving during wet on wet, your paper is too dry or your paint is too thick.
Fix: Add more water to your paint mixture. Re-wet the paper if needed. Tilt your board to encourage flow.
Advanced Tips and Techniques
Once you have mastered the basics, these techniques will expand your watercolor possibilities.
Salt Effects on Wet Watercolor
Sprinkling salt onto wet watercolor creates fascinating textures. The salt absorbs water and pigment, leaving starburst patterns when brushed away after drying.
This works best on very wet paper (stage 2). Use coarse salt for larger effects, fine salt for subtle texture. Experiment on scrap paper first to see how your specific paints react.
I use salt effects for creating starry skies, snow scenes, and textured foliage. It is one of my favorite special effects.
Brush Recommendations
Your brush choice affects both techniques.
For wet on wet: Use large soft brushes that hold plenty of water. Mop brushes and wash brushes work well. Natural hair holds more water than synthetic.
For wet on dry: Use a variety of brush sizes depending on your subject. Rounds work for most applications. Flats are good for washes and sharp edges. Keep your detail brushes in good condition for fine work.
Practice Exercises
Improve your skills with these focused exercises.
Exercise 1: Create a gradient wash using wet on wet. Start with saturated color at the top, dilute as you move down. Practice until you get a smooth transition.
Exercise 2: Paint the same simple shape using both techniques. Notice how the edges differ and how each feels to execute.
Exercise 3: Create a small landscape using the mixed technique workflow. Sky wet on wet, trees wet on dry, foreground details last.
Exercise 4: Practice the six stages of paper wetness. Wet your paper, time each stage, and paint a small mark at each stage to see the difference.
Frequently Asked Questions
What is the difference between wet-on-wet and wet on dry watercolor?
Wet-on-wet means applying wet paint to wet paper, creating soft, blended edges and flowing color. Wet-on-dry means applying wet paint to dry paper, producing sharp, defined edges and precise control. The key difference is paper wetness, which completely changes how the paint behaves.
What is the biggest mistake beginners make in watercolour?
The biggest mistake beginners make is using too much water without understanding paper wetness stages. This leads to backruns, blooms, and muddy colors. Beginners also often paint on damp paper thinking it is dry, causing unintended mixing between layers.
What is the golden rule of watercolor?
The golden rule of watercolor is to let each layer dry completely before adding the next. Patience prevents mud, preserves transparency, and maintains control over your painting. Rushing the drying process ruins more watercolor paintings than any other mistake.
What are the 4 pillars of watercolor?
The 4 pillars of watercolor are: 1) Wet-on-wet (wet paint on wet paper), 2) Wet-on-dry (wet paint on dry paper), 3) Dry-on-wet (dry brush on wet paper for texture), and 4) Dry-on-dry (dry brush on dry paper for details). Mastering these four techniques gives you complete control over the medium.
Which technique should I learn first as a beginner?
Beginners should start with wet-on-dry technique. It offers more control and predictable results, building the confidence and brush skills needed before tackling the more unpredictable wet-on-wet method. Once comfortable with wet-on-dry, wet-on-wet becomes easier to manage.
Can I combine wet-on-wet and wet-on-dry in one painting?
Yes, combining both techniques is standard practice in watercolor. Most artists start with wet-on-wet for backgrounds and atmospheric effects, let the paper dry completely, then add details using wet-on-dry. This layered approach creates depth and professional results.
How do I know when paper is the right wetness for wet-on-wet?
Paper is right for wet-on-wet when it has a soft satin sheen called the glistening stage. It should feel damp but not have visible puddles. Test by touching the back of your hand to the paper, it should feel cool but not wet.
Why does my wet-on-wet not turn out smooth?
Uneven wet-on-wet results usually mean your paper was not evenly wet or your paint consistency varied. Make sure to apply water uniformly across the entire area. Mix enough paint so you do not have to stop mid-wash, and work quickly before the paper starts drying.
Conclusion
Wet on wet vs wet on dry watercolor represents the fundamental choice every watercolor artist makes with each brushstroke. Wet on wet gives you soft, flowing, atmospheric effects perfect for skies and backgrounds. Wet on dry provides the control needed for details and realistic work.
The key to mastering both techniques lies in understanding paper wetness. Practice recognizing the six stages from soaking wet to bone dry. Start with wet on dry to build confidence, then gradually incorporate wet on wet as you become comfortable with the medium.
Remember that most beautiful watercolor paintings combine both techniques. The artists you admire use wet on wet for atmosphere and wet on dry for details. With patience and practice, you will develop the intuition to choose the right technique for each part of your painting. Now pick up your brush and start exploring what these fundamental techniques can do for your art.