If you have ever picked up a piece of bone dry pottery and watched it crumble in your hands, you understand why bisque firing exists. I learned this lesson the hard way during my first month in ceramics when a delicate sculpture I spent hours carving turned to dust before I could even think about glazing it.
Bisque firing is the critical first firing that transforms fragile, unfired clay into a porous, durable ceramic material ready for glazing. In this guide, I will walk you through exactly what bisque firing is, why you absolutely cannot skip it, and how to do it properly whether you are firing in a professional studio kiln or your first home setup.
By the end, you will understand the entire bisque firing process from loading greenware to unloading your finished bisque pieces, plus the common mistakes that cause pottery to explode in the kiln (and how to prevent them).
Table of Contents
What Is Bisque Firing in Pottery?
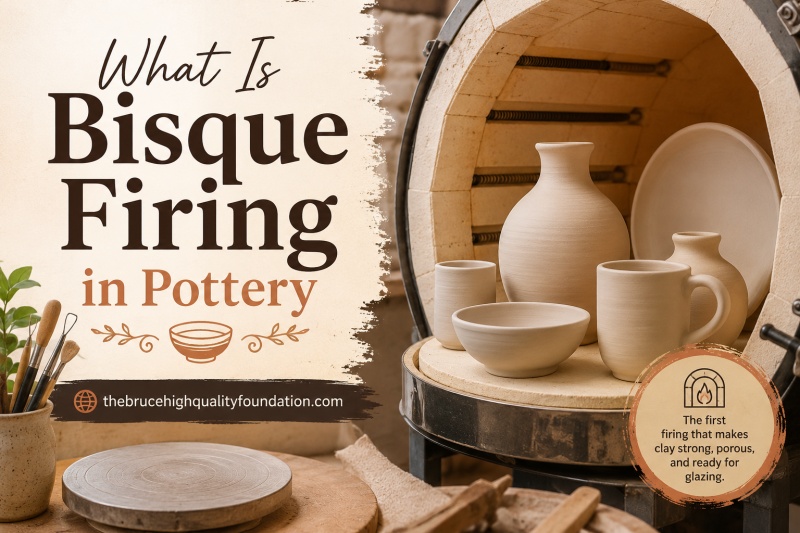
Bisque firing is the first firing of ceramic ware that converts bone-dry clay from its fragile, soluble state into a permanent, porous ceramic material. This process happens in a kiln at temperatures typically ranging from cone 06 (approximately 999 degrees Celsius or 1830 degrees Fahrenheit) to cone 04 (around 1060 degrees Celsius or 1940 degrees Fahrenheit).
During bisque firing, several critical chemical and physical transformations occur within the clay body. The firing drives off residual moisture, burns out organic materials and impurities, and completes dehydroxylation (the removal of chemically bound water from clay particles). These changes permanently alter the clay structure through a process called sintering, where clay particles begin to fuse together without fully melting.
The result is bisqueware, a porous, durable ceramic material that can absorb glaze, withstand handling during the glazing process, and survive the higher temperatures required for glaze firing. Unlike raw clay, bisque-fired pieces will not dissolve in water and have enough structural integrity to be sanded, cleaned, and worked on before the final firing.
Why Bisque Firing Is Essential
After spending over three years working in ceramics studios and home setups, I have come to appreciate just how many critical functions bisque firing serves. Here are the key reasons this step is absolutely non-negotiable in traditional pottery:
Hardens Clay for Safe Handling: Raw bone-dry clay is incredibly fragile. A slight bump or improper grip can shatter hours of work. Bisque firing transforms this delicate greenware into sturdy ceramic that you can handle confidently while glazing and decorating.
Creates Porosity for Glaze Adhesion: The porous nature of bisqueware is exactly what allows glaze to stick to the surface. Without bisque firing, glaze slides off clay or creates uneven coverage. The microscopic pores in bisque absorb glaze water, leaving the glaze materials deposited evenly on the surface.
Removes All Residual Moisture: Even clay that feels bone dry contains chemically bound water within its molecular structure. Bisque firing removes this water completely. If this moisture remains during glaze firing, it turns to steam and causes pieces to crack, break, or explode.
Burns Out Organic Materials: Clay bodies contain organic matter, carbon, and sulfur compounds. During bisque firing, these materials oxidize and burn away, preventing glaze defects like black specks, blisters, or carbon trapping that would ruin finished pieces.
Prevents Thermal Shock Damage: Bisque firing happens at lower temperatures than glaze firing. By completing this intermediate step, you reduce the thermal stress on pieces during the final high-fire, preventing cracking and warping.
Allows for Easy Cleanup: You can sand, clean, and repair bisque-fired pieces before glazing. This means smoothing rough spots, fixing small imperfections, and washing away dust that would otherwise cause glaze defects.
When Should Bisque Firing Be Done?
Bisque firing should only occur after your pottery has reached the bone dry stage. This means all visible moisture has evaporated from the clay, and the piece has achieved a uniform light color throughout (for most clay bodies, this appears as a pale version of the wet clay color).
The timing of bisque firing depends on several factors. Thicker pieces require longer drying times. A mug wall might dry in a few days, while a thick sculpture could need several weeks. Environmental conditions matter too. Clay dries faster in warm, dry, well-ventilated spaces. Humid climates extend drying time significantly.
I typically wait at least a week after the last visible wetness disappears before loading pieces for bisque. This ensures the interior moisture has equalized with ambient conditions. Many potters also use the cheek test. Lightly touching a piece to your cheek should feel room temperature, not cool. A cool sensation means residual moisture remains.
Attempting to bisque fire clay that is not fully dry is one of the most common causes of exploding pottery. The water inside turns to steam at 100 degrees Celsius, building pressure until the piece shatters. Always err on the side of longer drying times.
Step-by-Step Bisque Firing Process
Understanding the complete bisque firing process helps you achieve consistent results and avoid the disasters I witnessed in my early firing days. Here is the full workflow from preparation to completion:
Step 1: Inspect and Prepare Your Greenware: Examine each piece for cracks, weak spots, or trapped air bubbles. Gently sponge away any dust or debris. Ensure all pieces are labeled if firing for multiple people.
Step 2: Load the Kiln with Proper Spacing: Place pieces on kiln shelves with adequate space between them for heat circulation. Leave at least 2.5 centimeters (1 inch) between items, more for larger pieces. Use kiln posts to create multiple levels if needed.
Step 3: Program the Candling Phase: Set your kiln to candling temperature (approximately 93 to 121 degrees Celsius or 200 to 250 degrees Fahrenheit). Hold at this temperature for 2 to 4 hours to ensure complete dryness.
Step 4: Begin the Firing Ramp: Program your kiln to rise slowly. A typical bisque firing ramp is 150 degrees Celsius (270 degrees Fahrenheit) per hour until reaching 600 degrees Celsius, then 100 degrees Celsius (180 degrees Fahrenheit) per hour until the target temperature.
Step 5: Complete the Firing Stages: Your kiln will progress through evaporation (up to 100 degrees Celsius), organic burnout (200 to 600 degrees Celsius), dehydroxylation (400 to 600 degrees Celsius), quartz inversion (573 degrees Celsius), and sintering (above 800 degrees Celsius).
Step 6: Hold at Peak Temperature: Once reaching cone 06 or your target temperature, hold for 15 to 30 minutes to ensure even heat distribution throughout the kiln.
Step 7: Controlled Cooling: Allow the kiln to cool naturally. Do not open the kiln until temperature drops below 200 degrees Celsius (400 degrees Fahrenheit). Opening too early causes thermal shock and cracking.
Step 8: Unload and Inspect: Once fully cooled, remove your bisqueware. Pieces should ring when tapped (a dull thud indicates underfiring) and feel uniformly hard throughout.
Bisque Firing Temperature and Schedules
Understanding temperature ranges and firing schedules is essential for successful bisque firing. Different clay bodies and desired results require different approaches.
Standard Bisque Firing Temperatures: Most potters bisque fire between cone 08 (approximately 955 degrees Celsius) and cone 04 (approximately 1060 degrees Celsius). Cone 06 (approximately 999 degrees Celsius) is the most common choice for general studio work. Lower temperatures leave more porosity for glaze absorption. Higher temperatures create harder, less porous bisque that is better for specific glazing techniques.
Soft Bisque vs Hard Bisque: Cone 08 to cone 06 produces soft bisque, which is highly porous and ideal for dipping and pouring glazes. Cone 04 produces hard bisque, which is less porous and better suited for spraying or brushing glazes where you want thinner application.
Typical Firing Schedule: A standard bisque firing takes 8 to 12 hours of heating plus 12 to 18 hours of cooling. Candling adds 2 to 4 hours. The total process typically spans 24 to 36 hours from start to finish.
Ramp Rate Considerations: Slow ramps prevent thermal shock. Standard practice is 150 degrees Celsius per hour for the first phase, slowing to 100 degrees Celsius per hour above 600 degrees Celsius. Some clay bodies with high grog content or certain additives may need even slower ramps.
Always consult your clay manufacturer’s recommendations. Different clay bodies have specific requirements for optimal bisque results.
How to Load Your Kiln for Bisque Firing
Proper kiln loading significantly affects firing success. I have seen entire kiln loads ruined by poor loading practices that created uneven heating or trapped pieces.
Spacing Guidelines: Maintain at least 2.5 centimeters (1 inch) between pieces, with 5 centimeters (2 inches) preferred for larger items. Heat must circulate freely to ensure even firing. Crowded kilns create cold spots and underfired pieces.
Shelf Placement: Use kiln posts to create stable shelf levels. Position shelves to maximize space while allowing heat flow from elements or burners. In electric kilns, keep pieces at least 2.5 centimeters (1 inch) from elements. In gas kilns, avoid placing pieces directly in flame paths.
Support Fragile Pieces: Tall narrow pieces should be supported or placed where they cannot fall. Lids should be fired separately or propped open slightly to prevent warping. Handles and attachments need careful positioning to avoid stress.
Orientation Matters: Place pieces rim-down or on their strongest structural points. Avoid resting pieces on thin edges or fragile decorations. Nested bowls should have paper or fiber between them to prevent fusing.
Size Distribution: Distribute large and small pieces throughout the kiln rather than clustering sizes together. This helps balance heat absorption and prevents hot or cold zones.
Soft Bisque vs Hard Bisque: What’s the Difference?
Not all bisque firing is created equal. The temperature you choose determines whether you get soft bisque or hard bisque, and this choice affects your glazing options.
Soft Bisque (Cone 08 to Cone 06): Fired at lower temperatures, soft bisque remains highly porous. Water absorbs quickly into the surface, making this ideal for dipping glazes where you want thick, even coverage. The clay body retains more open pores, allowing glaze to penetrate slightly and bond mechanically. Soft bisque is also easier to sand and carve for decorative techniques. However, it is more fragile and prone to dusting or chipping during handling.
Hard Bisque (Cone 04): Higher firing temperatures create hard bisque with reduced porosity. Water absorbs more slowly, giving you more control over glaze application thickness. This is preferred for spraying, brushing, and layering multiple glazes. Hard bisque is more durable during handling and transportation. Some potters also prefer the slightly warmer color that higher bisque temperatures can bring out in certain clay bodies.
Matching Bisque to Glaze: If you plan to dip or pour glaze, stick with soft bisque. For brushing, spraying, or detailed glaze work, hard bisque gives better control. Your glaze manufacturer typically provides recommendations for optimal bisque temperature.
What Happens If You Skip Bisque Firing?
The question of whether you can skip bisque firing comes up frequently in pottery forums, especially among beginners eager to save time. I have seen this debate play out repeatedly, and the answer is nuanced but generally points toward keeping the bisque step.
Raw Glazing (Single Firing): It is technically possible to apply glaze to bone-dry clay and fire once to glaze temperature. This technique, called raw glazing or single firing, is used successfully by some experienced potters. However, it requires significant expertise. Greenware is extremely fragile, making glaze application risky. Any moisture in the clay body from glaze application can cause cracking. Glaze adherence is less reliable without the porous bisque surface.
Common Problems with Skipping Bisque: Pieces often crack during the single firing due to moisture stress. Glaze may crawl, blister, or flake off because it cannot bond properly to non-porous clay. The firing must be extremely slow to compensate for the moisture and chemical changes happening simultaneously, extending firing time significantly.
When Single Firing Works: Thin-walled pieces, specific clay bodies formulated for single firing, and certain low-fire applications can succeed with raw glazing. However, for most studio pottery, the risks outweigh the time savings.
The Verdict: For beginners and most production pottery, bisque firing is essential. The small time investment prevents major losses from ruined pieces. Only attempt single firing after mastering traditional two-fire techniques and understanding your materials thoroughly.
Common Bisque Firing Problems and Solutions
Forum discussions reveal that exploding pottery is the number one fear among new ceramicists. Having lost pieces myself to this frustrating problem, I want to share practical troubleshooting advice for the most common bisque firing issues.
Problem: Pieces Exploding in the Kiln: This creates a heartbreaking mess of shattered clay and potentially damages other pieces. Explosions occur when moisture trapped inside clay turns to steam, building pressure until the piece shatters.
Solution: Ensure clay is absolutely bone dry before firing. When in doubt, wait longer. Use the candling phase to drive out final moisture. Avoid thick sections that trap moisture in the center. Hollow out solid sculptures to allow moisture escape routes.
Problem: Cracking or Dunting: Cracks appear when pieces experience thermal shock from heating or cooling too rapidly. Dunting specifically refers to cracks from cooling stress, often appearing hours after firing completion.
Solution: Slow your firing ramp, especially through the quartz inversion temperature range (around 573 degrees Celsius). Ensure even wall thickness in your pieces. Do not open the kiln until fully cooled. Avoid placing cold kiln furniture directly into a hot kiln.
Problem: Black Coring: A gray or black core visible in broken bisque indicates incomplete burnout of carbon and organic materials. This weakens pieces and can cause glaze defects later.
Solution: Extend the organic burnout phase by slowing the firing ramp between 200 and 600 degrees Celsius. Improve kiln ventilation. Use clay bodies with lower organic content for thick pieces.
Problem: Underfired Bisque: Pieces that feel soft, do not ring when tapped, or absorb glaze too quickly may be underfired.
Solution: Check kiln calibration with witness cones. Ensure elements are functioning properly in electric kilns. Increase hold time at peak temperature. Verify thermocouple accuracy.
How to Bisque Fire Clay at Home
Setting up your first home bisque firing can feel overwhelming. I remember the mix of excitement and terror when I loaded my initial kiln at home, double-checking every setting three times. Here is practical advice for home potters.
- Kiln Selection: Small electric kilns are ideal for home bisque firing. Look for models with programmable controllers that handle ramp rates and hold times automatically. Even a small 40-liter (1.5 cubic foot) kiln can handle several mugs or small bowls per firing.
- Electrical Requirements: Most home kilns require 240V power on a dedicated circuit. Verify your electrical setup can handle the kiln’s amperage before purchasing. Extension cords are not safe for kiln use.
- Ventilation: Kilns release water vapor, carbon dioxide, and other gases during bisque firing. Ensure adequate ventilation, especially if firing in a garage or basement. Some kilns have vent systems that exhaust outside.
- Safety First: Never leave a firing kiln completely unattended for long periods. While modern kilns are safe, checking periodically is wise. Keep flammable materials away from the kiln. Use protective gloves and eyewear when opening a hot kiln. Install a smoke detector in the firing area.
- Practice with Test Pieces: Before firing your precious work, run test firings with simple, replaceable pieces. This helps you learn your kiln’s personality, hot spots, and quirks without risking pieces you care about.
- Join a Community: Local pottery clubs and online forums provide invaluable support. Having experienced potters to call when questions arise makes home firing much less intimidating.
Frequently Asked Questions
What is the point of bisque firing?
Bisque firing serves five essential purposes: it hardens fragile clay for safe handling, creates porosity for glaze adhesion, removes all residual moisture to prevent cracking, burns out organic materials that would cause glaze defects, and prepares pieces for the higher temperatures of glaze firing.
When should bisque firing be done?
Bisque firing should only be done after clay has reached the bone dry stage. Wait until pieces feel room temperature when touched to your cheek (not cool), have achieved a uniform light color throughout, and have been drying for at least several days after the last visible wetness disappeared.
Can I glaze without bisque firing?
While technically possible through a technique called raw glazing or single firing, skipping bisque firing is not recommended for beginners. Greenware is too fragile for glaze application, moisture from glaze can cause cracking, and glaze adherence is unreliable without a porous bisque surface. Two-fire pottery produces more consistent results.
How to bisque fire clay at home?
To bisque fire at home, you need a small electric kiln on a dedicated 240V circuit, adequate ventilation, and a programmable controller. Load bone-dry pieces with proper spacing, program a slow ramp with candling phase, fire to cone 06 (999C), allow 24-36 hours for complete cooling, and never leave the kiln unattended for long periods.
How long does bisque firing take?
A complete bisque firing typically takes 24 to 36 hours total. The heating phase lasts 8 to 12 hours, including 2 to 4 hours for candling. The cooling phase requires 12 to 18 hours. Never rush cooling, as thermal shock can crack your pieces.
What temperature is bisque firing?
Bisque firing typically occurs between cone 08 (955C) and cone 04 (1060C). Cone 06 (999C) is the most common temperature for general studio work. Lower temperatures create more porous soft bisque, while higher temperatures produce harder, less porous bisque.
Why did my pottery explode in the kiln?
Explosions occur when moisture trapped inside clay turns to steam, building pressure until the piece shatters. Prevent explosions by ensuring clay is absolutely bone dry before firing, using the candling phase to drive out final moisture, and hollowing out thick sculptures to allow moisture escape routes.
What is candling in bisque firing?
Candling is a pre-firing step where the kiln is held at a low temperature (93-121C) for 2-4 hours to ensure all moisture evaporates from the clay before the main firing begins. This is especially important for thick pieces or humid conditions.
Conclusion
Bisque firing is the essential first step that transforms fragile, bone-dry clay into durable, porous ceramic ready for glazing. Whether you are working in a professional studio or setting up your first home kiln, understanding the bisque firing process prevents costly mistakes and ruined pieces.
The key takeaways are simple but critical. Always ensure clay is bone dry before firing. Use the candling phase to eliminate final moisture. Fire slowly with proper ramp rates to prevent thermal shock. And never rush the cooling process.
What is bisque firing in pottery? It is the foundation that makes everything else in ceramics possible. Without this crucial step, your pottery remains fragile, unglazeable, and ultimately temporary. Master bisque firing, and you have mastered the gateway to truly successful ceramics.
Now that you understand the complete bisque firing process, your next step is simple. Prepare your greenware, load your kiln with confidence, and fire away. The satisfaction of opening a kiln full of perfectly bisqued pieces never gets old.